
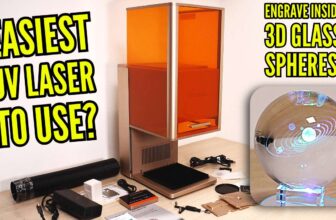
UV lasers are becoming increasingly popular due to their ability to engrave the widest range of materials compared to any other type of laser. With their ultraviolet 355nm wavelength and photochemical ablation mechanism, UV lasers can process metals, plastics, ceramics, , leather, glass, wood and more with high precision and minimal heat‑affected zones—offering broader material compatibility than any other laser class.
But they are quite expensive and the price rises quickly for higher power models. This is why many of you are questioning whether to get 5W or a 10W UV laser engraver.
Table of Contents
*The links on this website can be affiliate links. I earn a small commission at no extra cost to you. When you buy through these links you will support this website, which helps me to run this website(which cost money and a TON of time) and provide all these extensive reviews and information to you for free, without any paid membership.
5W vs. 10W ComMarker Omni 1 UV Laser Engraver
Since publishing my reviews of the 5W and 10W ComMarker Omni 1 laser engraver, I’ve received many more questions about how these two models compare. In this article, I’ll take a deeper look at their differences, focusing on more challenging materials, deep engravings, and cutting performance on various materials.


Both machines, come with lenses that share the same optical parameters—one for a 150mm working area and one for a 70mm working area so they can be easily compared performance wise. 150mm lens is meant for general use, the 70mm lens is primarily used for embedded glass engravings thanks to its shallow focus and its also good for engraving materials where a high power density is required.
5W vs. 10W UV Laser: Engraving and Cutting Wood
Wood is the material that has surprised me a lot when I tried to engrave and cut it with a UV laser. UV lasers produce little to no charring and can make incredibly deep and detailed engravings in wood.

Let’s start by comparing how both machines perform when engraving and cutting plywood using the same parameters. I tested engraving performance by engraving two high-speed crosshatch passes at varying frequencies. For cutting, I used 4mm thick Poplar plywood at medium speed, changing the number of passes for each rectangle.


Right away, it’s clear that the 10W ComMarker Omni 1 laser engraves significantly deeper and produces higher contrast. It also cuts the plywood much faster. I’m always impressed by how cleanly these machines can cut wood.
3D Wood Carving with 5W and 10W ComMarker Omni UV Laser Engraver
While we are already working with wood, I received many questions about how UV lasers handle deep 3D wood engravings. To test this, I created a quick design and ran just 24 passes at high speed, adding a cleanup pass at a higher frequency every 4 passes to reduce charring. I first ran the test on the 5W model, followed by the 10W.
It was satisfying to see the effect of the cleanup pass —especially for the final layer. Watch my YouTube video review to see it in action.


The results revealed that the wood grain caused some variation in engraving depth, which could be improved with a more homogeneous wood type. But the performance difference between the two machines was striking! The 10W ComMarker Omni 1 achieved an impressive 5.5mm depth in just 24 passes—almost twice as deep as the 5W Omni 1.
5W vs. 10W ComMarker Omni 1: Engraving Raw Aluminum
Next, I tested both machines on an aluminum plate. Aluminum is highly reflective and it shows us that the more power you have, the better it will be engraved. Raw aluminum is either engraved or not, depending on the settings. There is very little in between.


As expected, the 10W ComMarker Omni 1 performed significantly better, delivering stronger output across a wider frequency and Q-pulse range. The 10W UV Laser Engraver also produced noticeably deeper engravings. As I demonstrated in my review of the 10W ComMarker Omni, with enough passes, a UV laser is capable of engraving very deeply into aluminum.
The left engraving was done with the 10W machine and next to it I engraved the same logo using the same parameters with the 5W ComMarker Omni 1.

As expected, the engraving depth was noticeably shallower. However, when I halved the speed and doubled the number of passes—effectively taking four times as long—the result looked much more similar. This confirms that the 5W UV laser can also engrave deeply into aluminum, it just requires significantly more time to achieve comparable results. 5W ComMarker Omni 1 needed approximately 4 times longer to achieve the same result as the 10W model.
5W vs 10W UV Laser: Deep Stone Engravings
I also repeated the test I previously ran on stone with the 10W ComMarker Omni 1, engraving a “JT Makes It” logo at 500mm/s with 15 passes.

Interestingly, this time using the same settings, the 5W ComMarker Omni performed much more similarly to the 10W Omni UV laser engraver model. This is likely because stone is far less reflective than aluminum. When I halved the speed and doubled the number of passes and engraved the smaller logo next to it, the 5-watt Omni was able to engrave much deeper compared to the results we saw with aluminum.
Engraving natural river stone with UV lasers
If you’ve read my comparison article between UV and fiber lasers, you may remember I mentioned that UV lasers couldn’t engrave certain types of stone—specifically, I showed that they couldn’t engrave this river stone.

I need to correct that. I later discovered my parameters were set incorrectly during that test. After adjusting them, I was able to engrave this natural stone without any issues using both UV lasers. UV lasers produce very detailed and crisp results, it just takes more passes than with a fiber laser.
5W vs. 10W UV Laser For Engraving/Etching PCB Printed Circuit Boards
Since I previously showed the 10W ComMarker Omni etching a PCB, many of you asked whether the 5W version could do the same. I ran a quick test to compare how both machines remove the copper layer from an FR4 copper PCB board.


While both were able to remove copper, the 10W laser did it much faster and also engraved deeper into the base material. This suggests the 10W model could potentially be used for drilling holes and board cutout as well.
5W vs. 10W UV Laser For Engraving Glass
Now for perhaps the most important material: glass. I started by testing how fast 5W vs 10W UV laser engraver machine could engrave tempered glass. I used a pattern that varied speed and frequency settings.


The results show that the 10W ComMarker Omni 1 engraves glass more than twice as fast as the 5W version and produces much deeper marks.
Embedded engravings in the middle of the glass
When I demonstrated how I engraved in the middle of the glass using a 70mm lens with the 10W ComMarker Omni 1, many of you asked if the 5W model could do the same. So, I installed the 70mm lens on the 5W ComMarker Omni 1, focused it in the middle of a thick glass medallion, and engraved a “5W Omni” text at slow speed with multiple passes. I placed a stone beneath the medallion to avoid staining from laser reflections.


The result was a clean, embedded engraving—very similar to what the 10W model produced. The only drawback is that the 5W laser takes twice as long, and the process is already quite time-consuming.
5W vs. 10W UV Laser For Engraving Curved Glass Objects – Depth of Focus Range?
Next, I wanted to test the usable engraving depth by engraving on a curved wine glass. I focused both lasers on the very top of the glass surface for consistency, even though it’s not the ideal focus point for this case. Ideally you would focus the machine a bit lower. Using a low speed of 150mm/s and a coarse crosshatch fill, I engraved a square using both machines to test the maximum engraving range and see the usable engraving envelope on the curved surface.


To my big surprise, the 10W ComMarker Omni engraved a pattern that was only slightly larger (3mm wider) than the one made with the 5W one, which didn’t make sense to me.

To investigate, I ran another test on an angled piece of glass. I focused both lasers at the top of the two metal blocks, placing the ideal focal point around the middle of the engraving surface on the glass. I then engraved a narrow rectangle using a crosshatch fill, first with the 10W machine, and then with the 5W. The engraved line on the right is the 10W ComMarker Omni 1 and the left one was done with the 5W ComMarker Omni 1.


The results clarified everything. The focusing stick I used for the 5W model was about 1mm too long, which shifted the focus lower in the engraving range. In contrast, the 10W ComMarker Omni model was perfectly focused right at the level of the two blocks as the pattern is symmetrical above and below this line.
This explained why both machines performed similarly on the wine glass despite their power difference. it was because the 5W Omni was focused lower and this has caused it to have an advantage in this case. Otherwise the 10W ComMarker Omni 1 has a definite advantage in this case.
A wider focus range allows you to engrave larger designs on curved surfaces. This is especially applicable to glass. Because when a UV laser goes out of focus in glass, the beam can refract inside the material and end up engraving the inner surface of the glass instead like it did at the edges of my test patterns on the wine glass.
Cutting Glass With a UV Laser
Still one of the coolest things you can do with a UV laser is to cut through the glass itself. UV lasers are the only laser type that can ablate glass directly just like fiber lasers can ablate metal. By letting the engraving process run for longer, these machines can easily chew through the glass, opening cool new ways of customization. Of course the 10-watt machine can do this faster than the 5-watt.

Engraving and Annealing Stainless Steel With UV Laser
I also wanted to test whether it’s possible to anneal stainless steel using a UV laser. Annealing stainless steel is a surface heat treatment process (material is not ablated) that involves heating the metal to a specific temperature, where a thin layer of oxidation is formed on a surface which reflects the light and produces colors ranging from black to a full rainbow spectrum.


I started by engraving several test patterns while keeping the machines in focus. Interestingly, the 5W ComMarker Omni 1 actually performed better in this case, as I couldn’t reduce the engraving power on the 10W model enough for such tightly spaced lines. Because of that, the majority of test patterns resulted in rough brown colors, instead of a smooth black surface. The 5W ComMarker Omni 1 was even able to produce a few colors which is a result of a true annealing process.
De-focusing helps when annealing
However, when I de-focused the 10W ComMarker Omni 1 by 10mm and ran the test again, the results improved significantly. With a bit more fine-tuning, I’m confident I could achieve even better outcomes. So yes, annealing stainless steel with a UV laser is definitely possible—but fiber lasers still have an advantage in this area.

Conclusion
While the 10W model offers faster, deeper, and more efficient engraving—especially on tough or reflective surfaces—the 5W ComMarker Omni can achieve similar results with more time and passes. If you need higher speed and throughput, the 10W is clearly the better choice, but the 5W remains a capable and versatile option for less demanding workloads.
In short, the 10W ComMarker Omni 1 is better suited for professional engravers, small business owners, or high-end hobbyists who need faster engraving speeds, deeper cuts, and higher output for frequent use. The 5W UV laser engraver, on the other hand, is ideal for hobbyists or small businesses that use laser engraving to complement their main work—such as woodworkers or craft artists—who don’t need high-volume output and prefer a more compact, portable machine that doesn’t require an external water chiller.
Buy the ComMarker Omni 1 through my affiliate link to support this website at no extra cost to you and you can enjoy the 5% off discount code “jtmakesit” at checkout!
Thanks for reading this article—don’t forget to subscribe to our mailing list to stay informed when we publish new articles and you can also download our test pattern pack.
And leave a comment below and share your opinions!

This post was written by JT Makes It.
JT Makes It is an engineer, hobbyist, and DIY-er armed with a Master’s degree in Electrical Engineering and over a decade of professional experience in the industry. From an early age, JT Makes It was pushed by an insatiable curiosity, spending countless hours disassembling, understanding, improving, and creating various gadgets and products. This lifelong passion led to a broad spectrum of technical expertise ranging from electronics, woodworking, metalworking, and CNC machinery, with a particular focus on laser engravers.
For the past 9 years, he has shared his expertise through engaging videos on his YouTube channel. With the last three years dedicated to scrutinizing and testing laser engravers, he also created this website and emerged as a recognized authority in the field. His expertise extends across the spectrum of laser technologies, ranging from diode lasers, CO2 lasers, and fiber lasers, paying attention to details and providing practical insights.
With JT Makes It, expect a blend of technical expertise, backed with hands-on experience, and a genuine passion for innovation and creation, making him a trusted source in the realm of DIY and laser engraving enthusiasts alike.
*The links on this website can be affiliate links. I earn a small commission at no extra cost to you. When you buy through these links you will support this website, which helps me to run this website(which cost money and a TON of time) and provide all these extensive reviews and information to you for free, without any paid membership.
2 responses to “5W vs 10W ComMarker Omni 1 UV Laser: Which One Is Right for You?”

JT,
Thank you for the video. If you have time, would you let me know whether either the 5 watt Omni 1 UV laser or the 10 watt will cut shapes out of stained glass approximately 3 – 4 mm thick? I am an amateur stained glass hobbyist and I am thinking I might be able to cut intricate shapes. I sent an email directly to Commarker, but the reply was to the effect that I should experiment to see if I could cut shapes in stained glass. That was not especially helpful. Thank you again for your time. -Chuck GroveFor cutting glass this thick I would recommend 10W Omni, but i4mm is still ambitious. Maybe you would need to adjust focus height half way. Note that the cut edge will be at an angle – check the review of the 5W Omni where I cut 2mm glass.

Leave a Reply