
Today, we are going to take a look at the most advanced desktop CO2 laser cutter – the xTool P2S. This is an upgraded version of the xTool P2 model, which I tested a while ago. In this article, I will put the P2S through a series of tests to see how it performs in real-life tasks and compare its performance to the older xTool P2 model and what makes it one of the best laser cutters for wood..
Table of Contents
What is new in the xTool P2S compared to the xTool P2?
First, we will take a look at both machines to see the external differences. The xTool P2S is on the right and the P2 is on the left.

*The links on this website can be affiliate links. I earn a small commission at no extra cost to you. When you buy through these links you will support this website, which helps me to run this website(which cost money and a TON of time) and provide all these extensive reviews and information to you for free, without any paid membership.
The first upgrade we see is that the xTool P2S [US Store, EU Store, DE Store, FR Store, UK Store] features an easily removable exhaust fan, allowing for periodic cleaning. Additionally, the xTool P2S also features two exhaust fans in series, providing much more efficient fume extraction compared to the xTool P2, which has a single, non-removable fan.


The xTool P2S also has more connectors for accessories in the rear, such as the AP2 automatic smoke purifier, which I previously reviewed (click the link for our review). The P2S also features a locking USB key, which locks the machine when not inserted, preventing unauthorized use.


Before powering up the machine, you need to fill the cooling system with water and the included antifreeze.

If we look under the hood of the laser module, we can see that the xTool P2S features a distance sensor next to the close-up camera, which should allow for more precise autofocus and more intricate curved surface engravings. My old xTool P2 didn’t have this feature. The autofocus has two modes: a quick measure function, useful for working with large plywood sheets, and an aimed measure function, which can measure the height of a specific area. The xTool P2S also has a more powerful air assist pump.


The next important upgrade is the addition of magnetic screen mesh covers, which protect the exhaust fans from capturing large particles. These magnetic meshes are easy to remove and clean. The older xTool P2 didn’t have this feature, and a lot of dust could enter and clog the exhaust ports.


The xTool P2S also features upgraded beam mirrors, which are easier to grip for cleaning purposes. The beam alignment procedure for the xTool P2S is among the easiest of any CO2 laser on the market today. Mirror cleaning should be performed periodically to prevent damage and irreversible burn marks. Replacement mirrors can be bought for both machines.
The xTool P2S comes with a slat bed, which provides the best cutting performance and the most efficient smoke extraction. The slats can be easily removed, and if you use the riser base, you can quickly place much taller objects underneath or even use the rotary attachment. The machine also comes with spring-loaded hold-down clips, which help keep wood sheets straight and steady while cutting.


However, if you are cutting smaller objects, it is beneficial to use the honeycomb bed to prevent small parts from falling through and potentially getting damaged by the laser beam. The honeycomb bed does not provide as efficient smoke extraction, so minimal smoke stains may be present on the bottom side of the parts. The honeycomb comes with magnetic hold-down pins to help keep wood sheets straight and steady.


Now it’s time to test the real-life performance of the xTool P2S and see how it compares to the older P2 model.
Plywood Engraving Test Pattern
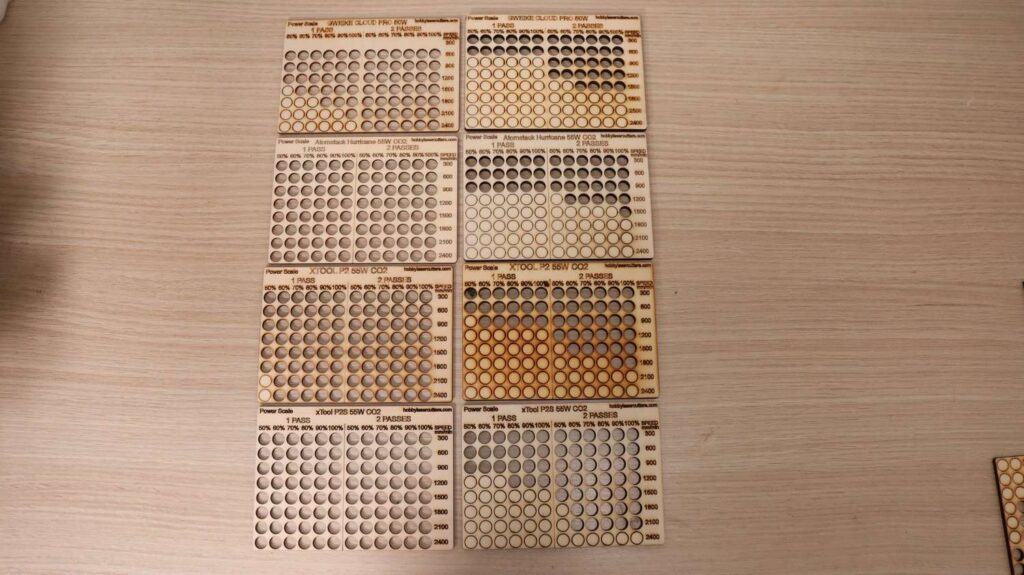
The first test on the list is my standard plywood engraving test pattern. This pattern evaluates engraving performance at different speeds and power levels, as well as in both directions and in photo engraving.
Looking at the results, we can see that the xTool P2S performed incredibly well in this test. The engraving performance is excellent at all speeds and directions, with very few smoke stains present.

Comparing the results with the older xTool P2, we can see that the upgraded air assist in the P2S is working exceptionally well—the difference is like night and day! Here is how it compares to the Atomstack Hurricane and the Gweike Cloud Pro.

You can download our test patterns HERE if you would like to test your machine too. The download also contains files we use for testing diode laser engravers and galvo fiber lasers. You will also get subscribed to our newsletter which will notify you when we publish new articles (1-2 times a month max).
High-Speed Engraving Test
The next test on the list is the high-speed engraving test, performed at 500mm/s to assess how the machine handles high-speed operations. The improved acceleration on the x-axis in this model is clearly visible. Once again, the xTool P2S produces fewer smoke stains, and the engravings have more contrast compared to the older xTool P2.


If we also compare it to other similar CO2 laser engravers we see that the Atomstack Hurricane also produced minimal smoke stains, but upon closer inspection, we can see that the edges of the fills are not as well-defined as those from other machines due to its slower acceleration.
Anodized Aluminum Test – Assessing Mechanical Precision and Laser Spot Size
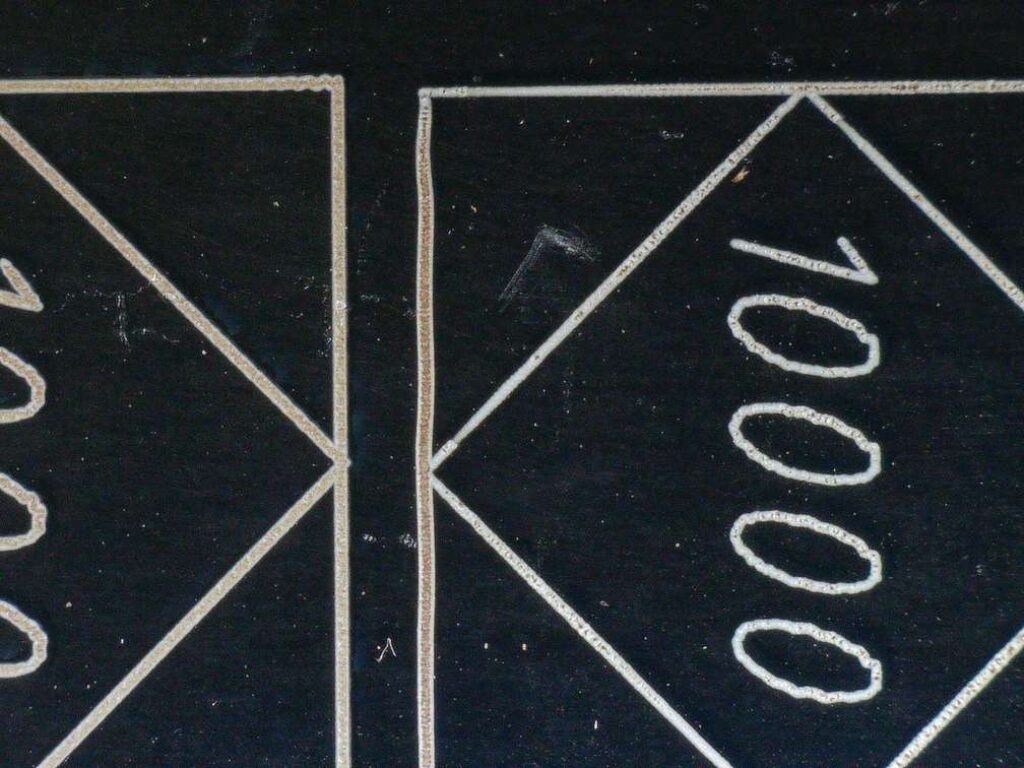
Next, I engraved the anodized aluminum test pattern, which is used to test mechanical precision by engraving small text, the mechanical stability is assessed by engraving three squares at different speeds, ranging from 100 to 10,000mm/min. And the interval test measures the laser spot size and shape.

Looking at the results under a microscope, we can see that even the smallest text was engraved perfectly, with zero vibrations. Examining the three squares, we see that the 100mm/min and 1,000mm/min engravings are flawless, while at 10,000mm/min, minor mechanical vibrations appear due to rapid acceleration. Overall, the performance is top-tier. The interval test confirms that the laser spot size is 0.2mm square, which is standard for a CO2 laser.


You can download our test patterns HERE if you would like to test your machine too. The download also contains files we use for testing diode laser engravers and galvo fiber lasers. You will also get subscribed to our newsletter which will notify you when we publish new articles (1-2 times a month max).
Focus Distance Test
The next test examines how much the laser spot increases with distance, which indicates how well the machine will cut thicker materials. The focus distance test consists of four squares, each engraved 3mm farther from the optimal focus.

The results show that the beam remains very small up to 6mm before slightly increasing. The xTool P2S remains one of the best-performing CO2 lasers in this test—only a few diode lasers have performed better. This means that it will cut thick materials very well.
Plywood Cutting Test Pattern
To put this theory into practice, I ran my standard laser cutting test pattern on 3mm(1/8″) and 6mm(1/4″) thick Poplar plywood. This test evaluates cutting performance at different speeds and power levels with one or two cutting passes.

The results confirm that the xTool P2S performed incredibly well. Compared to the older xTool P2, smoke stains are significantly reduced thanks to the improved air assist pump. The P2S demonstrates the best cutting performance of all CO2 lasers I have tested, especially on thicker plywood.
You can download our test patterns HERE if you would like to test your machine too. The download also contains files we use for testing diode laser engravers and galvo fiber lasers. You will also get subscribed to our newsletter which will notify you when we publish new articles (1-2 times a month max).
To illustrate this, I engraved sample wedding tags to show how fast the xTool P2S can cut 3mm thick plywood. This efficiency saves a significant amount of time when making large batches. The engraving performance is excellent at 50mm/s and only 4% power. And it was able to cut these tags at a lightning fast 45mm/s! Examining the cut edges, we can see that there is no charring—the edges are clean and smooth.
Acrylic Cutting Test
Next, I conducted a cutting test on 3mm(1/8″) thick transparent acrylic. Once again, the xTool P2S proved to be the best in class, outperforming the competition.
I then tested cutting 10mm(0.4″) thick acrylic, and the P2S was able to cut it in almost a single pass at 10mm/s. Only the last millimeter needed the second pass. I suppose it could be cut in one pass at 8mm/s. The cut edge was smooth and glassy—far superior to results achieved with diode lasers.

For the ultimate test, I attempted to cut 15mm(0.2″) thick acrylic. The older xTool P2 model could cut it at 2mm/s, and the P2S managed to cut it cleanly too. Then I tried cutting it at double the speed at 4mm/s and it almost did it. Then I reduced the speed to 3mm/s, and it was still able to cut it. This represents an incredible performance increase from the earlier P2 model, with cuts that are both smooth and clean.
Cutting VERY Thick Spruce Wood
I then attempted to cut an 18mm(0.71″) thick spruce board.


Here, I demonstrated the advantage of the dual-camera system in the xTool P2S. Since the main camera is mounted at an angle, distortion occurs when photographing tall objects. However, using the near-field camera mounted on the laser head, I was able to capture a perfect top-down photo. Laser cutting produces a lot of smoke, which is efficiently extracted by the upgraded exhaust fan. The cuts were clean, with minimal charring. Even for complex shapes, the results were impressively precise.

Engraving on Toothpicks – Ultimate Camera Precision Test
Finally, it was time to put the dual-camera system to the ultimate test. Other machines rely on a single-camera system with a maximum positioning accuracy of around 1 to 3mm, but the xTool P2S promises much better precision.
To test this, I engraved small text on randomly oriented toothpicks. I used a fill method for the first one and scored the outline on the bottom two. The results were very promising—the positioning accuracy is incredible!
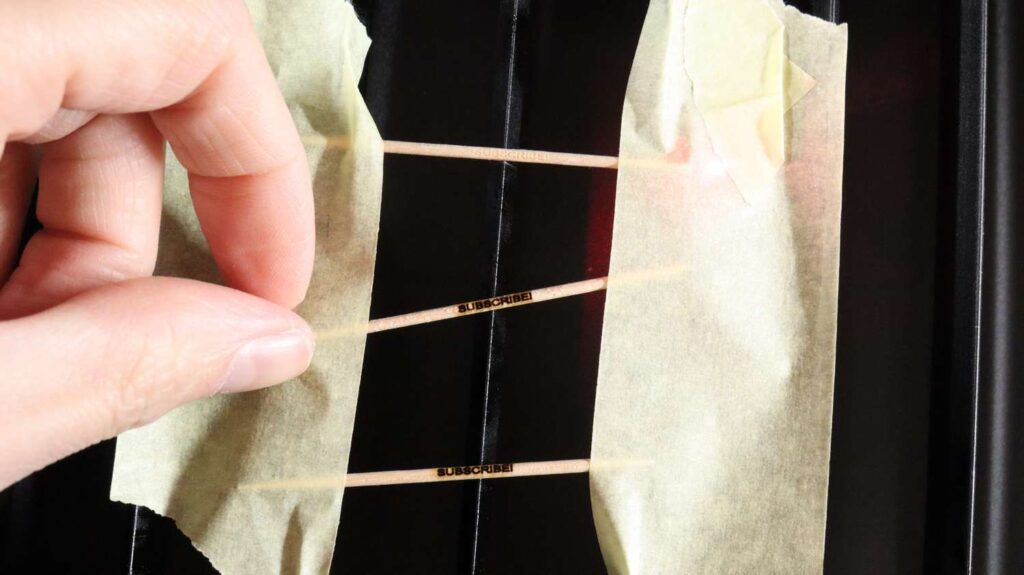

This not only reduces material waste but also enables far greater precision for engraving on small parts.
Curved Surface Engraving
I also conducted a quick test to see how well the xTool P2S performs at mapping curved objects. I placed a banana on the laser bed and ran a curved surface mapping sequence. Thanks to a fast sensor, it mapped the surface quickly. When finished, I observed a highly detailed height map of the banana—an impressive result that could be even more refined with a higher density of points.


The xTool P2S can also dynamically adjust the focus distance when engraving with rotary attachment which will be very convenient for engraving oddly shaped tumblers.
Conclusion
With features like the dual-camera system, enhanced autofocus, and a more efficient air assist, this machine delivers exceptional performance for both engraving and cutting.
Whether you’re working with small items, large boards, tall objects or even curved surfaces, the P2S stands out as one of the best CO2 laser cutters on the market as there are a ton of accessories available so you can tailor the machine to your specific needs.
Thanks for reading this article! If you plan to buy the xTool P2s, you can click this affiliate link, where I get a small commission at no extra cost to you which help me to maintain this website and provide free reviews for you! YOu can also get it in the xTool Amazon store!
And if you are looking at a larger CO2 laser cutter, then you should definitely check out my review of the new flagship 80W CO2 laser cutter – the xTool P3.
*The links on this website can be affiliate links. I earn a small commission at no extra cost to you. When you buy through these links you will support this website, which helps me to run this website(which cost money and a TON of time) and provide all these extensive reviews and information to you for free, without any paid membership.

This post was written by JT Makes It.
JT Makes It is an engineer, hobbyist, and DIY-er armed with a Master’s degree in Electrical Engineering and over a decade of professional experience in the industry. From an early age, JT Makes It was pushed by an insatiable curiosity, spending countless hours disassembling, understanding, improving, and creating various gadgets and products. This lifelong passion led to a broad spectrum of technical expertise ranging from electronics, woodworking, metalworking, and CNC machinery, with a particular focus on laser engravers.
For the past 9 years, he has shared his expertise through engaging videos on his YouTube channel. With the last three years dedicated to scrutinizing and testing laser engravers, he also created this website and emerged as a recognized authority in the field. His expertise extends across the spectrum of laser technologies, ranging from diode lasers, CO2 lasers, and fiber lasers, paying attention to details and providing practical insights.
With JT Makes It, expect a blend of technical expertise, backed with hands-on experience, and a genuine passion for innovation and creation, making him a trusted source in the realm of DIY and laser engraving enthusiasts alike.
6 responses to “xTool P2S vs xTool P2: Is It Worth the Upgrade? Best Desktop CO2 Laser Review and Test”

I love your website. I am a new crafter and looking for guidance on purchasing a CO2 laser to use to subsurface glass, acrylic and crystal. I want to make gifts and memories for people. I am not sure which direction to go as I am new to this and need to start this as a new hobby/slide hustle. I am disabled and need to supplement my income as you can imagine things are a little tough. Can you please give me some guidance on which CO2 laser would be best for me to mainly focus on subsurface and etching glass, crystal, and acrylic. I am a new student of your! Thank you very much.
For subsurfacing glass you would need a specialized machine just for this. CO2 laser can engrave glass surface, but it causes relatively rough surface. If you want smooth surface you should check my review of the UV laser: https://hobbylasercutters.com/commarker-omni-1/
But even this one is very tricky to set up for subsurface engraving.
I’m a recent subscriber – thanks for the useful reviews! I’ve used lasercutters at other people studios but now need to buy one for myself.
I mainly cut paper (a LOT of paper as I’m making a room full of larger than life botanical forms, so usage level is like a business really) but would like option to cut acrylic and less of a priority/need plywood.
My priorities are 1) being able to put large sheets of paper through 2) ease of use in terms of calibration.
Which machine should I go for (up to $7000)
This link shows older work in case it’s of interest!
https://www.janeprophet.com/withdrawing-room-2/
Paper and acrylic can be easily cut either by CO2 laser like xTool P2S or Atomstack Hurricane.
All of which I have tested on this site:
https://www.janeprophet.com/withdrawing-room-2/Just note
Great Article! I’ve been looking and looking for more information. One question: can you use LightBurn with the xTool P2S? I’ve been using Diode’s, and all my designs are in LightBurn. I know I would need to upgrade LightBurn, but I really don’t want to recreate all my designs, and I love LightBurn’s features.
I’m looking for a laser that might work out of the box. I got a lemon Diode of another brand that I’m returning, so I’m almost scared to click the buy button. 😉
Oh, I tried to click some of your links and they were broken. I really wanted you to get the affiliate commission for such a great article! (I have blogs in a different space, I know how important that is)
Hi, Thanks for your comment! The P2S can be controlled with Lightburn, but you can’t use advanced functions like cameras or curved surface engraving. Also you need to manually enter the material thickness for focusing. But other than that it works in Lightburn just like any other laser.

Leave a Reply