Atomstack A5 20W in-Depth Review And Test – Is it Any Good?

The Atomstack A5 20W Laser Engraver

This Atomstack A5 20W in-depth review will help you properly evaluate the performance of this laser engraver to see if it will be good choice for you.

It is is a mid-range laser engraver. It offers a large work surface and has a quality aluminum construction, which is very rigid.  I ordered the machine from Banggood, from CZ warehouse (since I live in EU) and the machine was delivered in a week and the items were packed neatly and nothing was damaged.

*The links on this website can be affiliate links. I earn a small commission at no extra cost to you. When you buy through these links you will support this website, which helps me to run this website(which cost money and a TON of time) and provide all these extensive reviews and information to you for free, without any paid membership.

Assembly

The Atomstack A5 20W laser engraver comes with good assembly instruction manual which Is easy to follow. All the necessary tools are included. Screws and parts come in separate bags, labeled accordingly to the necessary step in the assembly manual. The machine is assembled in less than 30 minutes.

Atomstack a5 package contents

Specifications

Parameter Value
Engraving Size
410*400mm
Engraving Materials
All wood, bamboo, Paper, Plastic, Leather, PCB Board, Aluminum Oxide, Non-reflective plating, black acrylic and lacquered metal
Laser Output Optical Power
4.5~5W
Laser Wavelength
455±5nm
Focusing Method
Fixed focus laser
Operating Software
LaserGRBL, LightBurn, support Win XP / Win 7 / Win 8 / XP / Win 10 system.
Input voltage
AC100-240V, 50/60Hz
Weight
4.0kg
External size
570*600*270mm
Warranty
One Year

Laser Diode

The Atomstack A5 20W laser engraver comes with a laser diode which outputs approximately 4.5W of optical power. The machine is advertised as 20W, but these are most likely the input power watts. Laser diode is a fixed focus diode which is great.

Some previous generations of laser engravers came with an adjustable focus (which is convenient at first sight, but it is not so much after a while). Fixed focus means there are no moving parts in a beam’s way, which means that the focus can be narrower and focusing procedure is much quicker than with the adjustable focus. The head has a little shield around it, as an extra layer of protection, but wearing included safety googles is still a MUST. I would also recommend getting more quality protection googles with OD6+ protection. You only have one pair of eyes. Protect them! These lasers work in visible light spectrum and even reflections can be very harmful for your eyes!

Focusing procedure

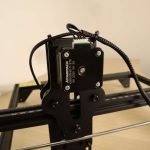
For optimal cutting, the head needs to be 2mm above the engraving surface. Focusing is done by putting an acrylic sheet/shim under the laser head and lowering the head on the shim. The shim is 2mm thick and after tightening the z axis screws with a hex key, the head stays 2mm above the surface. And of course, you need to remove the shim afterwards 😊

Cutting and Engraving Different Materials

The Atomstack A5 20W can engrave many materials and it can also cut some stuff.

Engrave: wood, leather, cotton (clothing), rubber, paper, fruit, foam, acrylic, black anodized aluminum…

Cut: wood, paper, tape, cloth, acrylic, cardboard…

With the machine you can cut paper and tape in one pass and cardboard or wood in multiple passes. The machine can cut wood, especially Poplar plywood which is soft and it is the preferred wood for all laser cutters.

We have tested the machine with engraving and cutting different materials. You will find the results of our tests few chapters lower.

Software and Supported Formats

You can use Atomstack A5 20W with free LaserGRBL software which works OK, but it is a little bit clumsy to use. It is great for some tests, but I chose Lightburn instead which is much more capable software, and it is very intuitive to use. It is not free though, but the license costs only 40$. But, the software offers 1 month fully functional free trial which will help you decide if it is worth it to you. For me it was worth it because it saves so much time (which is not free).

With LaserGRBL you can import vector files (NC, BMP, JPG, PNG, DXF…) and bitmap image files (bmp, jpg, png and gif),

Lightburn supports more formats: AI, SVG, DXF, PDF, HPGL, PLT, and RD for vector formats and PNG, JPEG, BMP, TIFF, TGA, and GIF for image formats.

Vector format is preferred format for these machines because it contains the paths around the shape edges on which the laser head tracks. Engraving vector files is faster because the laser directly cuts on the path versus scanning like a printer and making dots when engraving bitmap images (photos).

You can get millions of free vector designs on the internet, or you can use free vector drawing programs like Inkscape or QCAD (for more technical drawings)

You can also import tons of vector designs and images from free vector sites or you can buy great laser designs on websites like Etsy. This really expands your capabilities.

Our Test Results

With the Atomstack A5 20W we have performed the more or less standardized test which we perform on all the laser engravers and cutters. So it is easy to compare results between machines. Here you have the video showing how the tests were done and below you will find detailed images of the test results together with explanation.

Wood Engraving

Our standard engrave pattern is designed to showcase the engraving capabilities at different settings, so you can see the effectiveness of the laser beam. Lets see the result in more detail in the below chapters.

If you want to test your own laser, you can get the below test file HERE.

standard pattern laser engraved on wood
Standard pattern laser engraved on wood

Power Scale

The power scale test pattern shows how the machine engraves with different power levels at different speeds.

Power is vaired from 10% to 100% in 10% increments and the speeds are 600, 1200, 1800 and 2400mm/min. They are a bit difficult to read under that smoke stains :)

Here I have made a little mistake by forgetting to remove the high power-low speed shapes as they get burned a lot and show no practical data.

Interval Scale

The interval scale test is here to show if the laser focus spot shape is square or rectangular.  The scanning interval is progressively increased from 0.1mm to 0.5mm.

In this case the shape is rectangular as it behaves differently when scanning horizontally versus vertically. We will be able to estimate the exact spot shape later when we test the engraving on anodized aluminium.

Photo Engraving

Here is a test of engraving a small photo, 20mm in size while changing the maximum laser power.
Photos are quite slow to engrave because the laser head must scan line by line like an inkjet printer. If you want to engrave a very large photo, prepare to wait a couple of hours :)

Photo engraving on wood

Vector Image Engraving

Vector images are much faster to engrave as the laser head directly follows the lines. You can not make a grayscale image though.

Our test includes this cute photo of a Tit bird which took only a few minutes to engrave.
In the software you can set to fill the closed shapes with pattern, on this one, the shape is filled by scanning with 0.1mm step. For big engravings you could increase the step to 1mm or more, to make engraving faster. It would make a raster or a grid this way. but more on this some other time.

Anodized Aluminum Engraving

Next, we have tested the Atomstack A5 20W on a scrap piece of black anodized aluminum.

Below is the engraved test pattern which is setup to evaluate the focus dot size in both directions as well to see the effects of speed. Next we will further examine the separate parts of the test pattern.

The most importart part is again the interval scale. By scanning vertically and horizontally with different interval steps we can approximate the laser dot size. From the results we can see that the laser dot is a rectangular, approximately 0.1mm wide and 0.35mm high as with a bigger step, the lines are not touching any more.

Here are the pictures taken with an Andonstar AD407 digital microscope.

Next is testing with different text sizes. We can see that with this machine, 2mm text size is still ok, but 1mm text height becomes unreadable. There is also some wobbling present in one axis, but this is probably due to the mechanical effects. But we need to take in the effect that the speed is also quite high for this test (600mm/min). With lower speed the accuracy increases as we will see later.

Atomstack a5 anodized aluminum text engraving


Below is the engraving of two sets of squares on the right side, one inside the other. The inner square is engraved with 1000mm/min and the inner square is at 100mm/min.

We can see that at higher speed there is more wobbling present (mechanical) but the speed shows to have no effect on brightness of the engraved pattern.

There is also clear effect of rectangular dot shape in the lower two squares as vertical lines are much thinner than horizontal ones.

Laser Focus Distance Test

In this test we will see how the laser dot size increases further down into the material. The longer down in the material the dot stays focused, the thicker material you will be able to cut.

We achieve this by progressively increasing the focus distance by 3mm for each square.

0mm means that the focus is perfectly set (with 2mm shim). The 3mm square is engraved by lowering the test piece 3mm lower than the optimal focus. The result is is how big the dot is 3mm down into the material. The same principle goes for larger distances.

Atomstack a5 focus distance test

We can see that 3mm lower than the optimal focus, the dot is still not increased much The  interesting thing is that the horizontal line is more or less the same size, but the vertical one shows more thickening.

Atomstack a5 focus distance test

But farther away we go, the dot starts to increase significantly. At 6mm and 9mm the dot becomes quite thick and interestingly, it does not show the rectangular shape anymore.

You can use the thickening effect in cases when you want to engrave bigger stuff with low detail. The engraving will be done faster this way as the step interval can be bigger.

Atomstack a5 focus distance test

Acrylic

Did a short test on 3mm black acrylic (plexi glass) at 600mm/min. The engraving and cutting came out great with a clean cut edge.

Tried to make the same test on blue acrylic but it did not work as the blue color does not absorb the laser light well enough, probably the material is not dark enough and after 50 passes with full power, it only melted the board a little. There is no sign of engraved letters. Conclusion is that the Atomstack A5 20W laser machine can cut and engrave only very dark acrylic.

Plywood Cutting Test

Test was made at three different speeds with 3mm and 6mm thick Poplar plywood being cut.
The test was performed in both scanning directions – horizontal X axis (left-right) and vertical Y axis (back to front) as the cutting performance is different in each direction because the dot has rectangular shape

You can see the cutting process in the video if you want to see how it went, but here are the results:

Speed 3mm plywood 6mm plywood
300mm/min
2 passes for vertical, 4 passes for horizontal
3 passes for vertical, 7 passes for horizontal
600mm/min
3 passes for vertical, 11 passes for horizontal
6 passes for vertical, 14 passes for horizontal
900mm/min
4 passes for vertical, 9 passes for horizontal
12 passes for vertical, 19 passes for horizontal

From the results you can see that the lower the speed, the more charring occurs. Faster the seed, more passes are needed.
And you see that the cutting performance of Atomstack A5 20W is much better in Y axis because of the rectangular dot shape.

Hardwood Cutting Test

This test shows how well the Atomstack A5 20W laser engraver machine cuts harder woods at 600mm/min.
First we tried to cut 4mm pine wood which is still quite soft.

The machine had no problems cutting it. It went through with 14 passes and left a clean cut.

Then we tried harder Beech wood, 3mm thick and the machine struggled a bit cutting at X axis. It needed 46 passes to cut through and a lot of charring occurred on X axis.

A Good Mid-Tier Laser Engraver

Conclusion

Atomstack A5 20W is good at engraving and a little less good for cutting because of rectangular dot size. This will also cause problems when cutting some tight fitting joints, as the tolerances would be hard to adjust for a good fit. You would need to take the dot shape in to the account when drawing the design.
If you would like more cutting performance and smaller dot size, you could also consider his bigger brother, the Atomstack A5 Pro 40W.

If you like the machine, you can buy the machines through the links below:

Buy Atomstack A5 20W

Be sure to also check out my reviews of newer laser engravers HERE!

Top offers
5.7 Total Score
Atomstack A5 20W

Good laser engraver, but the rectangular diode may not be good for every task

6.8Expert Score
Machine construction
8
Laser power
6.5
Laser focus
4.5
Engraving performance
7
Cutting performance
5
Ease of assembly
8
Focusing procedure
7.5
Price/performance
7.5
4.5User's score
Machine construction
4
Laser power
8.5
Laser focus
3
Engraving performance
4
Cutting performance
3.5
Ease of assembly
5
Focusing procedure
4
Price/performance
4
PROS
  • Affordable
  • Easy to set up
  • Good for engraving non detailed stuff
CONS
  • Quite big rectangular dot
  • Weak cutting performance
  • Negative
Add your review  |  Read reviews and comments
10 Comments
Show all Most Helpful Highest Rating Lowest Rating Add your review
  1. Pleas where testing pictures download. Thanx.

    • Reply
      Hobby Laser Cutters October 3, 2021 at 16:22

      Hi, I have added a form, so everyone can download the file:
      https://hobbylasercutters.com/download-test-files/

  2. The information help me understand my machine. My primary motive for purchasing the A5 20W was to engrave pens I turned on my lathe. I made a wonderful choice. The engraving quality is excellent!

  3. 0.6
    Machine construction
    0
    Laser power
    100
    Laser focus
    0
    Engraving performance
    0
    Cutting performance
    0
    Ease of assembly
    0
    Focusing procedure
    0
    Price/performance
    0

    Great article….I just have one question I’ve seen 3 website selling atomstack lasers…atomstack.com a.d atomstack.net witch one is legit or are they both..??

    Helpful(0) Unhelpful(0)You have already voted this
  4. 3.85
    Machine construction
    80
    Laser power
    70
    Laser focus
    60
    Engraving performance
    80
    Cutting performance
    70
    Ease of assembly
    100
    Focusing procedure
    80
    Price/performance
    80

    Really helpful review. I’ve had my laser for about a year now, and have stuck with GRBL for now.
    My question is, can you upgrade this by getting a new diode head?

    Thanks

    Jeff

    Helpful(0) Unhelpful(0)You have already voted this
  5. This is so confusing. You say that these are not 20W lasers. You stated “The Atomstack A5 20W laser engraver comes with a laser diode which outputs approximately 4.5W of optical power. The machine is advertised as 20W, but these are most likely the input power watts.” When I’m shopping, MANY brands say 20W OUTPUT. So which are these different machines? 4.5-5w or 20w? So confusing and mis-leading when you are purchasing your first laser engraver.

    • Reply
      Hobby Laser Cutters January 27, 2024 at 16:02

      The Atomstack A5 is an old machine. At that times the power outputs were advertised differently. This is why we test many of them on our site. Now the manufacturers state the correct power figures. 20W engravers are usually in the 500$+ range currently.

    Leave a reply

    Your total score

    Hobby Laser Cutters and Engravers
    Logo
    Compare items
    • Cameras (0)
    • Phones (0)
    Compare