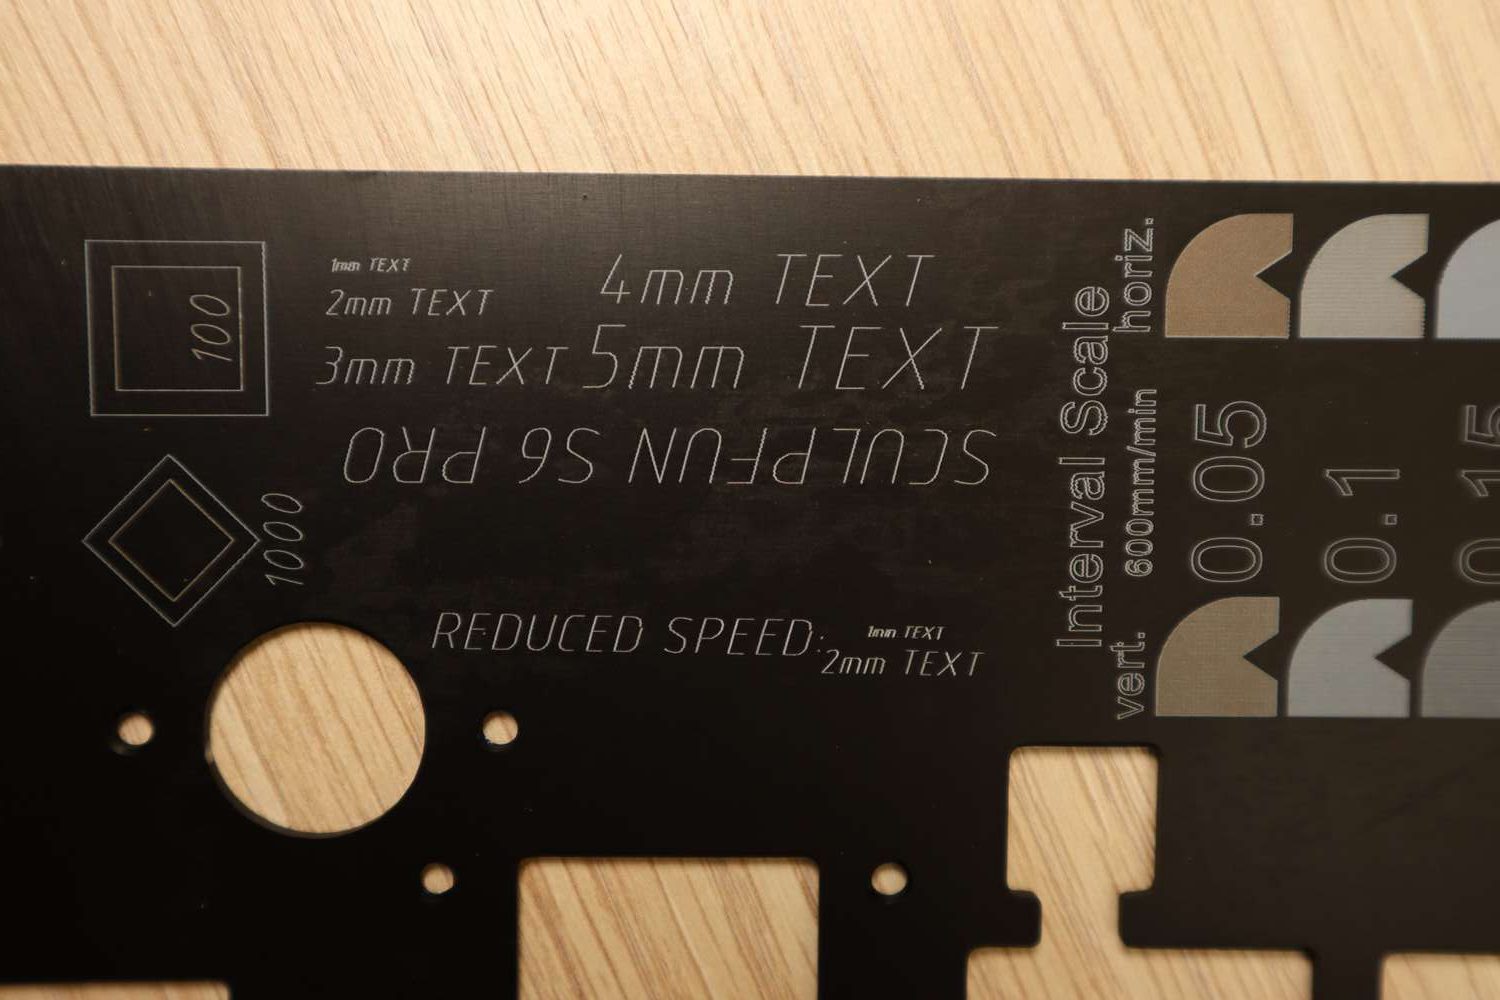
New Sculpfun S6 Pro vs S6 – Which Laser Engraver Is The Best For YOU? [2021 Performance Test]

I’ve been researching laser engraving machines for a while and have finally decided to share my findings with you, in an unbiased comparison. I believe that if you’re considering purchasing one of these machines, then this blog post will be helpful for you. Specifically, I’ll compare two popular models – the Sculpfun S6 vs the Sculpfun S6 Pro. To make your decision easier, let’s see which machine has more advantages: cost, usability or speed?Read on to find out!

The Sculpfun S6 and S6 Pro Laser Engravers

*The links on this website can be affiliate links. I earn a small commission at no extra cost to you. When you buy through these links you will support this website, which helps me to run this website(which cost money and a TON of time) and provide all these extensive reviews and information to you for free, without any paid membership.

The Sculpfun Company And Their S6 Pro and S6 Laser Engravers

Sculpfun is a relatively new company. They specialize in small laser engravers for hobby use and small businesses. The engravers share some of the features with the competitors like Atomstack, but the Sculpfun seem to offer that little extra bits, that separates them from the crowd and provides better bang for the buck.

The Sculpfun laser engraver comes with good assembly instruction manual which Is easy to follow. All the necessary tools are included. Screws and parts come in separate bags, labeled accordingly to the necessary step in the assembly manual. The machine can be assembled in less than 30 minutes.

Sculpfun S6 Pro laser engraver

Specifications

Parameter Value
Engraving Size
410*420mm
Engraving Materials
wood, paper, cardboard, plastic, white, PCB board, aluminum oxide, black-painted metal/ceramic
Laser Output Optical Power
5.5-6W
Laser Wavelength
455±5nm
Focusing Method
Fixed focus laser
Operating Software
LaserGRBL, LightBurn, Benbox, GrblController, LiteFire, Support Windows system, Support OSMAC system. Supported file formats NC, BMP, JPG, PNG, DXF and other image formats.
Input voltage
AC100-240V, 50/60Hz
Weight
3.0kg
Warranty
One Year

Laser Diode

The Sculpfun S6 and S6 pro laser engravers come with a laser diode which outputs approximately 5.5W of optical power. The Sculpfun S6 Pro is advertised to have a 60W Co2 laser equivalent power and the S6 has an advertised equivalent power of 30W. Laser diode is a fixed focus diode which is great. Both machines have more or less the same output power, but the S6 Pro is advertised to have much smaller focus dot. We are going to test that later in this post.

Fixed focus means there are no moving parts in a beam’s way, which means that the focus can be narrower and focusing procedure is much quicker than with the adjustable focus.

The head has a little protection shield around it, as an extra layer of protection, but wearing included safety googles is still a MUST. I would also recommend getting more quality protection googles with OD6+ protection. You only have one pair of eyes. Protect them! These lasers work in visible light spectrum and even reflections can be very harmful for your eyes!

Focusing procedure

For optimal cutting, the head needs to be approximately 3mm above the engraving surface. Focusing is done by putting the supplied aluminium block under the laser head and lowering the head on it. After tightening the z axis screws with a thumb screw, the head stays 3mm above the surface. Compared to the Atomstack, which requires an hex wrench, this is a much faster method of adjusting the focus.

Focusing procedure for Sculpfun s6 pro with the supplied aluminium block

Cutting and Engraving Different Materials

The Sculpfun S6 and S6 Por can engrave many materials and it can also cut some stuff.

Engrave: wood, leather, cotton (clothing), rubber, paper, fruit, foam, acrylic, black anodized aluminium…

Cut: wood, paper, tape, cloth, acrylic, cardboard…

With the machines you can cut paper and tape in one pass and cardboard or wood in multiple passes. The machines can cut wood, especially Poplar plywood which is soft and it is the preferred wood for all laser cutters.

We have tested the machine with engraving and cutting different materials. You will find the results of our tests few chapters lower.

Software and Supported Formats

You can use Sculpfun laser engravers with free LaserGRBL software which works OK, but it is a little bit clumsy to use. It is great for some tests, but I chose Lightburn instead which is much more capable software, and it is very intuitive to use. It is not free though, but the license costs 60$. But, the software offers 1 month fully functional free trial which will help you decide if it is worth it to you. For me it was definitely worth it because it saves so much time (which is not free).

The machine is supposed to work also with Benbox, GrblController and LiteFire software, but we haven’t tested them yet.

With LaserGRBL you can import vector files (NC, BMP, JPG, PNG, DXF…) and bitmap image files (bmp, jpg, png and gif),

Lightburn supports more formats: AI, SVG, DXF, PDF, HPGL, PLT, and RD for vector formats and PNG, JPEG, BMP, TIFF, TGA, and GIF for image formats.

Vector format is preferred format for these machines because it contains the paths around the shape edges on which the laser head tracks. Engraving vector files is faster because the laser directly cuts on the path versus scanning like a printer and making dots when engraving bitmap images (photos).

You can get millions of free vector designs on the internet, or you can use free vector drawing programs like Inkscape or QCAD (for more technical drawings)
You can also import tons of vector designs and images from free vector sites or you can buy great laser designs on websites like Etsy. This really expands your capabilities.

Our Test Results

With both, the Sculpfun S6 Pro and the S6, we have performed the more or less standardized test which we perform on all the laser engravers and cutters. So it is easy to compare results between machines. At the top of this article, you have the video showing how the tests were done and below you will find detailed images of the test results together with explanation.

Wood Engraving

Our standard engrave pattern is designed to showcase the engraving capabilities at different settings, so you can see the effectiveness of the laser beam. Lets see the result in more detail in the below chapters.

If you want to test your own laser, you can get the below test file HERE.

Power Scale

The power scale test pattern shows how the machine engraves with different power levels at different speeds.

Power is varied from 10% to 100% in 10% increments and the speeds are 600, 1200, 1800 and 2400mm/min. We have omitted the slow speed/high power shapes that we did with the Atomstack A5 20W, because the beam burns too much at slow speeds. This leaves a big charred blob that gives no practical information.

The Sculpfun S6 pro shows a little bit more output power but because of the smaller focus dot size the effect is not as visible as the engrave interval for filling the shapes is set to 0.1mm which is smaller than the S6 focus dot(you will see that later in this post), but bigger than the S6 Pro focus spot. This means that with the S6, the beam was overlapping at each line and with the S6 Pro it was not.

Even when looking at the text engraving, the S6 Pro shows much smaller focus spot.

Interval Scale

The interval scale test is here to show if the laser focus spot shape is square or rectangular.  The scanning interval is progressively increased from 0.1mm to 0.5mm.

In the case of Sculpfun S6, the shape is rectangular as it behaves differently when scanning horizontally versus vertically.

The S6 pro shows to have a much smaller spot which is much closer to the square shape.

We will be able to estimate the exact spot shape later when we test the engraving on anodized aluminium.

Photo Engraving

Here is a test of engraving a small photo, 20mm in size while changing the maximum laser power.
Photos are quite slow to engrave because the laser head must scan line by line like an inkjet printer. If you want to engrave a very large photo, prepare to wait a couple of hours :)

As we can see below, the Sculpfun S6 has a big advantage in this case as it has a smaller focus spot and therefore, the photo engraving looks much more detailed.

Vector Image Engraving

Vector images are much faster to engrave as the laser head directly follows the lines. You can not make a grayscale image though.

Our test includes this cute photo of a Tit bird in the top right corner of the test piece. The bird engraving took only a few minutes to engrave. In the software you can set to fill the closed shapes with pattern, on this one, the shape is filled by scanning with 0.1mm step. For big engravings you could increase the step to 1mm or more, to make engraving faster. This way it would make a raster or a grid on the black areas. But more on this at some other time.

Anodized Aluminum Engraving

Next, we have tested the Sculpfun S6 Pro and Sculpfun S6 on a scrap piece of black anodized aluminum.

Below is the engraved test pattern which is setup to evaluate the focus dot size in both directions as well to see the effects of speed. Next we will further examine the separate parts of the test pattern.

The most important part is again the interval scale. By scanning vertically and horizontally with different interval steps we can approximate the laser dot size. From the results we can see that the laser dot of the S6 30W is a rectangular, as the engraved pattern looks very different when scanning in horizontal (X Axis) and vertical (Y Axis) direction.

The S6 Pro has much smaller beam size. Because of that, the engravings come out much more detailed. And the interval test shows us that the S6 Pro much smaller dot that is much more rectangular. The engraving of text is also much more defined and detailed on the S6 Pro.

The text engraving is done at 600 mm/s which is quite fast for such small movements, and therefore some shaking of the laser head is visible in the corners. This can be easily avoided by reducing the acceleration and speed in the settings. With the speed and acceleration reduced by only a factor of two, the result is much better.

Let’s do some further testing with the digital microscope. Here are the pictures taken with an Andonstar AD407 digital microscope.

First thing that we see is that the S6 pro has much smaller dot shape, sized approximately 0.1 times 0.2 millimetres, while the S6 dot size is very rectangular, sized approximately 0.08mm times 0.4mm.

Next is testing with different text sizes. We can see that with this machine, 2mm text size is still ok, but 1mm text height becomes unreadable. There is also some wobbling present in one axis, but this is probably due to the mechanical effects. But we need to take in the effect that the speed is also quite high for this test (600mm/min). With lower speed the accuracy increases as we will see later.

Below is the engraving of two sets of squares on the right side, one inside the other. The inner square is engraved with 1000mm/min and the inner square is at 100mm/min.

We can see that at higher speed there is more wobbling present (mechanical) but the speed shows to have no effect on brightness of the engraved pattern.

There is also clear effect of rectangular dot shape in the lower two squares as vertical lines are much thinner than horizontal ones.

Laser Focus Distance Test

In this test we will see how the laser dot size increases further down into the material. The further down in the material the dot stays focused, the thicker material you will be able to cut.

We achieve this by progressively lowering the board by 3mm for each square, without refocusing the laser head.

0mm means that the focus is perfectly set (with aluminium block). The 3mm square is engraved by lowering the test piece 3mm lower than the optimal focus. The result shows how big the dot is 3mm down into the material that is being cut. The same principle goes for larger distances.

focus test sculpfun s6 pro vs atomstack a5

We can see that 3mm lower than the optimal focus, the dot is still not increased by much for the Sculpfun S6 Pro.  The  interesting thing is that the shape of the beam in the S6 is getting less rectangular and more square the farther away we go.

But farther away we go, the dot starts to increase significantly. At 6mm and 9mm the dot becomes quite thick.

You can use the thickening effect to your advantage in cases when you want to engrave bigger stuff with low detail. You set up the laser in this out of focus postiion. The beam will be larger and the engraving will be done faster this way as the distance between engraved lines can be bigger.

focus test sculpfun s6 pro 40w vs s6 30w

Acrylic Engraving And Cutting

Did a short test on 3mm black acrylic (plexi glass) at 600mm/min. The engraving and cutting came out great with a clean cut edge on both machines. The Sculpfun S6 did it in 16 passes, the Sculpfun S6 Pro took only 10 passes to cut cleanly through.

Tried to make the same test on blue acrylic but it did not work as the blue color does not absorb the laser light well enough, probably the material is not dark enough or the blue color reflects the blue laser light and after 50 passes at 600mm/min with full power, both machines only melted the board a little. There is no sign of engraved letters. Conclusion is that the Sculpfun S6 and S6 Pro laser machine can cut and engrave only very dark acrylic boards.

Plywood Cutting Test

Test was made at three different speeds with 3mm and 6mm thick Poplar plywood being cut.
The test was performed with both machines in both scanning directions – horizontal X axis (left-right) and vertical Y axis (back to front) as the cutting performance is different in each direction because the dot has rectangular shape in the Sculpfun S6.

You can see the cutting process in the youtube video above if you want to see how it went, but here are the results:

From the results you can see that the lower the speed, the more charring occurs. Faster the speed, more passes are needed.
And you see that the cutting performance of Sculpfun S6 30W is much better in Y axis because of the rectangular dot shape. The cutting performance of the Sculpfun S6 Pro is much more balanced in both directions.

Hardwood Cutting Test

This test shows how well the Sculpfun S6 and S6 Pro laser engravering machines cut harder woods at 600mm/min.
First we tried to cut 4mm pine wood which is still quite soft.

Both machines had no problems cutting it. Both went through in 12 passes.

Then we tried harder 3mm thick Beech wood,  the S6 machine struggled a bit cutting at X axis. It needed 50 passes to cut through and a lot of charring occurred on X axis. The beam probably cut through a little earlier, but the piece did not fall off and it is difficult to guess when the cut was done good enough.
The Sculpfun S6 Pro had no problems cutting it and did it in 9 passes.

The best laser engraving machines for the price!

Conclusion

You may be wondering if you should buy Sculpfun S6 or the more expensive Sculpfun S6 Pro. If your primary focus is laser engraving, then we can recommend buying the cheaper S6 30W machine that’s just as good! But if you primarily do a lot of laser cutting work and you want to engrave detailed photos, then it might be worth investing in the Sculpfun S6 Pro which will give you more bang for your buck over time. We hope this article has helped clarify what to consider when purchasing a new laser engraver and leads to an informed decision about which one would suit your needs best. To get started with either of these machines, simply click on the links below!

If you like the machines, you can buy the machines through the links below:

Buy Sculpfun S6 ProBuy Sculpfun S6

Be sure to also check out my reviews of newer laser engravers HERE!

Top offers
24 Comments
Show all Most Helpful Highest Rating Lowest Rating Add your review
  1. Dear,

    Can you send me the lightburn test file for engraving.
    (for the layer settings)

    thanks,
    Bruno

  2. I am also interested in the Lightburn file.
    When I tested to cut the supplied 2.7mm plywood, it left a thick layer of “soot” (roet) on the inside of the green acrilic cylinder … normal ?

    Tnx
    Roland

    • Some “soot” is normal to accumulate on the inside. But you can wipe it off. You also should clean the lens with a cotton swab every now and then. It will improve the performance.
      I sent you the lightburn file via email.

  3. Hello, I have just purchased a Sculpfun S6 Pro and I am very interested in your test file. Do you know if the file is compatible with LaserGRBL software?

    • Hi,
      I have sent you the test file.

      But it is not compatible with LaserGRBL as the Lightburn uses some parameters to set the power scale to specific shapes.
      You can try it with free trial though.

      • Hi,
        I have sent you the test file.

        But it is not compatible with LaserGRBL as the Lightburn uses some parameters to set the power scale to specific shapes.
        You can try it with free trial though.

  4. I buy and already get Sculpfun S6 Pro
    Can you send me the lightburn test file for engraving.
    (Need for the layer settings)

    big thx, Andrej

  5. Sorry, i’d like to recive the test file for sculpfun s6pro thank’s.

  6. i just got my sculpfun S6 Pro and i am trying to laser my first image and my laser will only go side to side and not up and down. what am i doing wrong. i am using lasergrbl for my software

  7. Is it possible to use a rotary attachment with either of the Sculpfun lasers

    • Yes, The Sculpfun will release their own roller system in just a few days. We are already testing it and will publish an article when we finish.

  8. great review, where can I get one from in the UK without having to inport it?

    • You can get it through the links at the end of the post. If you order at Banggood, there will be no import costs as the Banggood sends it with taxes and customs already pre-paid. You only pay the list price and shipping. No extra costs at your border.
      But I would recommend you getting the much more capable Sculpfun S9, I have a great coupon code for it(till the end of the month), and you can get it for only 299$ if you use my code at the end of the article:
      https://hobbylasercutters.com/sculpfun-s9/

  9. Hello., you con send me the test files please?

  10. Hello I would like to add air to my s6 pro, I put an s9 laser on. I would like to know where to wire up a relay for lightburn to turn it on. Thank You

    • Reply
      Hobby Laser Cutters August 2, 2022 at 14:30

      Hi, You can now get the air assist for the S9 laser:
      EU version: https://hobbylasercutters.com/go/sculpfun-air-assist-eu/
      US version: https://hobbylasercutters.com/go/sculpfun-air-assist-us/
      We are testing it right now and it works very well!
      All these air assists are turned on manually with a switch on the pump. There is no software control for it.

  11. Thank You for the reply. I will do it manually

    Leave a reply

    Hobby Laser Cutters and Engravers
    Logo
    Compare items
    • Cameras (0)
    • Phones (0)
    Compare