
- The Ortur Laser Master 2 Pro Laser Engraver
- Contents of This Review
- What is the Ortur Laser Master 2 Pro?
- Specifications
- Laser Diode
- Focusing procedure
- Special Features
- Cutting and Engraving Different Materials
- Software and Supported Formats
- My Test Results
- Wood Engraving
- Power Scale
- Interval Scale
- Photo Engraving
- Vector Image Engraving
- Anodized Aluminium Engraving
- Laser Focus Distance Test
- Acrylic Engraving And Cutting
- Plywood Cutting Test
- Hardwood Cutting Test
- Engraving Stainless Steel
- Conclusion
The Ortur Laser Master 2 Pro Laser Engraver
What is the Ortur Laser Master 2 Pro?
The Ortur is probably one the most popular laser engraver brands on the market. Laser Master 2 Pro is their high-end machine, and it cost about 100$ more than the Sculpfun S9, or S6 Pro or an Atomstack A5 Pro we have tested previously. In this article you will find information that will help you decide if this machine is worth the extra cost to you.
Like the Sculpfun, or the Atomstack, the Ortur Laser Master 2 Pro laser engraver also comes with an assembly instruction manual which Is easy to follow. But compared to the Sculpfun or Atomstack manual, the Ortur assembly manual is a little bit less clear than the other two. It took us well over an hour to completely assemble the machine, because some of the steps were not so clear and we have forgot to slid some nuts in the aluminium profiles in an earlier step and the machine needed to be taken apart again to fix that. The Sculpfun and Atomstack instruction manuals are easier to follow. But its not a big deal. All the necessary tools are included. Screws and parts come in a few bags which are not labeled accordingly to the necessary step in the assembly manual. The machine can be assembled in a good hour or a bit more.


*The links on this website can be affiliate links. I earn a small commission at no extra cost to you. When you buy through these links you will support this website, which helps me to run this website(which cost money and a TON of time) and provide all these extensive reviews and information to you for free, without any paid membership.
Specifications
| Parameter | Value |
|---|---|
Engraving Size |
400*400mm |
Engraving Materials |
wood, paper, cardboard, plastic, white, PCB board, aluminum oxide, black-painted metal/ceramic |
Laser Output Optical Power |
5 -5.5W |
Laser Wavelength |
445±5nm |
Focusing Method |
Fixed focus laser |
Operating Software |
LaserGRBL, LightBurn, Benbox, GrblController, LiteFire, Support Windows system, Support OSMAC system. Supported file formats NC, BMP, JPG, PNG, DXF and other image formats. |
Input voltage |
AC100-240V, 50/60Hz |
Weight |
4.5kg (Package weight) |
Warranty |
One Year |
Laser Diode
The Ortur Laser Master 2 Pro laser engraver come with a LU2-4 laser diode which outputs approximately 5.5W of optical power. Ortur Laser Master 2 Pro is advertised to be 20W input power rated. Laser diode is a fixed focus diode which is great. The laser diode is claimed to have a rectangular beam spot shape of 0.08mm x 0.15mm. We are going to test that later in this post.
Fixed focus means there are no moving parts in a beam’s way, which means that the focus can be narrower and focusing procedure is much quicker than with the adjustable focus.
It surprised us how small the laser head is compared to the Sculpfun or the Atomstack. I guess this is because they wanted to reach a very high engraving speed of 10000mm/min (which is very very high – Sculpfunn or Atomstack are rated at 6000mm/min max). But at such fast speed the quality should suffer a lot. We are going to make some speed tests to see how it performs.
This laser also has a 32-bit control circuit board, which should allow better motor control and better photo engravings. We will test if this is true in real life application.


The head has a swiveling protection shield around it, as an extra layer of protection, but wearing included safety googles is still a MUST.
Compared to other brands, the shield sits quite high above the engraving surface and it blocks very little light. Because of that, this machine produces a lot more scatttered light and the beam is much brighter when you look at it with protection glasses as it is often not covered with protection shield.
I would also recommend getting more quality protection googles with OD6+ protection. You only have one pair of eyes. Protect them! These lasers work in visible light spectrum and even reflections can be very harmful for your eyes!
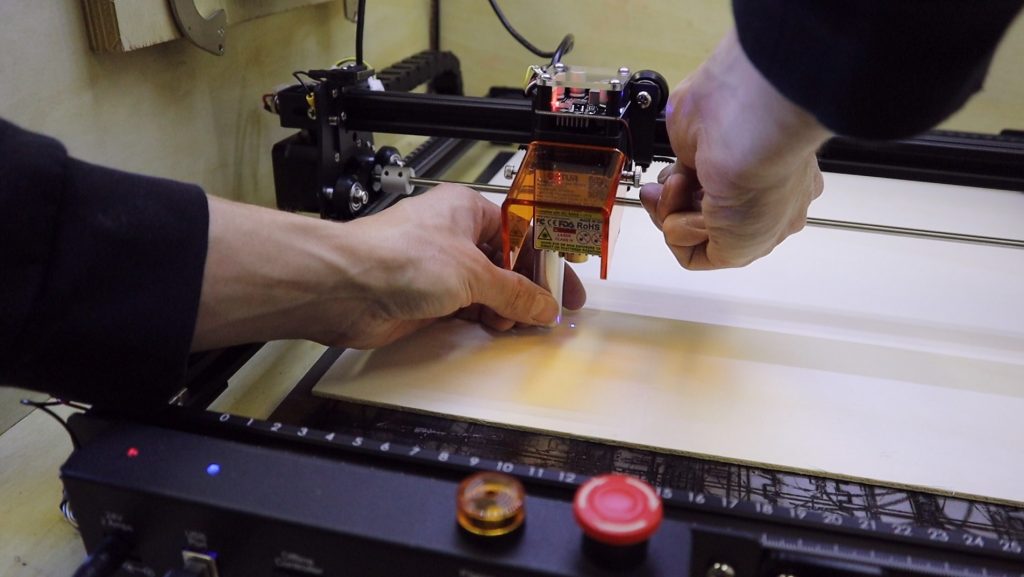
Focusing procedure
The diode sits on a very promising looking metal rail system. But the laser head is still tightened by a thumb screw from the side.
The focusing procedure can be done with the included aluminium focusing block. The focusing procedure is similar to the Sculpfun, but in my opinion its a little bit more fiddly . For optimal cutting, the heatsink needs to be 40mm above the engraving surface. Focusing is done by putting the included 40mm aluminium block under the laser head and lowering the head on the block and tightening the side thumb screw.
You can get a very good Z axis screw focusing system from Ortur for around 50$ which should get rid of all these problems, but the add-on is quite expensive and we didn’t decide to get it.
Special Features
Ortur Laser Master 2 Pro also has some special features worth mentioning:
Emergency Stop Button
It has a mushroom style emergency knob (which feels a little fragile though) which comes in handy when you need to turn off the machine in a hurry.

Limit Switches
This is probably one of the best features which I hope that all lasers would have someday. Limit switches enable you to home the machine automatically so that it always starts from the same spot. This way, if you stop the engraving or add another layer of work (or if the machine has crashed mid-work), you can be sure that the machine will start working at exactly the same spot that you want.


Fire Sensor and Alarm
Ortur Laser Master 2 Pro has a light sensor looking at the engraving area. When it detects a flame (your material has caught fire) it immediately stops the machine and starts beeping to get your attention. This is a cool feature but I noticed that it causes more problems than it solves. The machine was stopping frequently when cutting wood near the sensor. Maybe the reflections are too high and it detected a false positive. But thanks to the limit switches, the work can be continued by starting the job from where it was stopped. Without the limit switches that would be impossible.
Here is where the fire sensor is positioned:
Cutting and Engraving Different Materials

Engrave: wood, leather, cotton (clothing), rubber, paper, fruit, foam, acrylic, black anodized aluminium, blackened metal, stone, ceramic , stainless steel…
The Ortur Laser Master 2 Pro is also a capable cutter.
Cut: wood, paper, tape, cloth, acrylic, cardboard…
With the machine you can cut paper and tape in one pass and cardboard or wood in multiple passes. The machine can cut wood, especially Poplar plywood which is soft and it is the preferred wood for all laser cutters.
We have tested the machine with engraving and cutting different materials. You will find the results of our tests few chapters lower.
Software and Supported Formats
You can use the Ortur Laser Master 2 Pro laser engraver with free LaserGRBL software which works OK, but it is a little bit clumsy to use. It is great for some tests, but I chose Lightburn instead which is much more capable software, and it is very intuitive to use. It is not free though, but the license costs 60$. But, the software offers 1 month fully functional free trial which will help you decide if it is worth it to you. For me it was definitely worth it because it saves so much time (which is not free).
With LaserGRBL you can import vector files (NC, BMP, JPG, PNG, DXF…) and bitmap image files (bmp, jpg, png and gif),
Lightburn supports more formats: AI, SVG, DXF, PDF, HPGL, PLT, and RD for vector formats and PNG, JPEG, BMP, TIFF, TGA, and GIF for image formats.
Vector format is preferred format for these machines because it contains the paths around the shape edges on which the laser head tracks. Engraving vector files is faster because the laser directly cuts on the path versus scanning like a printer and making dots when engraving bitmap images (photos).
You can get millions of free vector designs on the internet, or you can use free vector drawing programs like Inkscape or QCAD (for more technical drawings)
You can also import tons of vector designs and images from free vector sites or you can buy great laser designs on websites like Etsy. This really expands your capabilities.
My Test Results
In the video at the top of this article, I have tested the performance of the Ortur Laser Master 2 Pro and have compared some of the results with its direct competitor Sculpfun S9. You will find the Ortur results in this post. For the results of the Sculpfun S9, check our other post here!
I have performed the more or less standardized test which we perform on all the laser engravers and cutters. This way, it is easy to compare results between machines. There you have the video showing how the tests were done and below you will find detailed images of the test results together with explanation.
Wood Engraving
Our standard engrave pattern is designed to showcase the engraving capabilities at different settings, so you can see the effectiveness of the laser beam. Lets see the result in more detail in the below chapters.
If you want to test your own laser, you can get the below test file HERE.

Power Scale
The power scale test pattern shows how the machine engraves with different power levels at different speeds.
Power is varied from 10% to 100% in 10% increments and the speeds are 600, 1200, 1800 and 2400mm/min. We have omitted the slow speed/high power shapes that we did with the Atomstack A5 20W, because the beam burns too much at slow speeds. This leaves a big charred blob that gives no practical information.
On the first sight, the Ortur Laser Master 2 Pro shows a little bit less output power than the Sculpfun S9.

Interval Scale
The interval scale test is here to show if the laser focus spot shape is square or rectangular. The scanning interval is progressively increased from 0.1mm to 0.5mm.
In this test, the Ortur Laser Master 2 Pro tends to show signs of rectangular beam shape, as the vertical and horizontal scans look a bit different. But its still quite good.
We will be able to estimate the exact spot shape later when we test the engraving on anodized aluminium.

Photo Engraving
Here is a test of engraving a small photo, 20mm in size while changing the maximum laser power.
Photos are quite slow to engrave because the laser head must scan line by line like an inkjet printer. If you want to engrave a very large photo, prepare to wait a couple of hours 🙂
As we can see below, the Ortur Laser Master 2 Pro did engrave the photo quite well, although it looks a little bit less detailed than with Sculpfun S9, which had more contrast with its engraving and was able to engrave with less power for the same result which in practice means being able to engrave with faster speeds.

Vector Image Engraving
Vector images are much faster to engrave as the laser head directly follows the lines. You can not make a greyscale image though with this technique.
Our test includes this cute photo of a Tit bird in the top right corner of the test piece. The bird engraving took only a few minutes to engrave. In the software you can set to fill the closed shapes with pattern, on this one, the shape is filled by scanning with 0.1mm step. For big engravings you could increase the step to 1mm or more, to make engraving faster. This way it would make a raster or a grid on the black areas. But more on this at some other time.

Anodized Aluminium Engraving
Next, we have tested the Ortur Laser Master 2 Pro on a scrap piece of black anodized aluminium.
Below is the engraved test pattern which is setup to evaluate the focus dot size in both directions as well to see the effects of speed. Next we will further examine the separate parts of the test pattern.


The most important part is again the interval scale. By scanning vertically and horizontally with different interval steps we can approximate the laser dot size. From the results we can see that the laser dot of the Ortur Laser Master 2 Pro is rectangular, as the engraved pattern looks different when scanning in horizontal (X Axis) and vertical (Y Axis) direction.
The text engraving is done at 600 mm/s which is quite fast for such small movements, and therefore some shaking of the laser head is visible in the corners. This can be easily avoided by reducing the acceleration and speed in the settings. Although the Ortur Laser Master 2 Pro did show very little wobble of the axis, probably due to a smaller and lighter laser head. (which should get less cooling because of that, this could potentially affect the lifespan of the head)
Let’s do some further testing with the digital microscope. Here are the pictures taken with an Andonstar AD407 digital microscope.


First thing that we see is that the Ortur Laser Master 2 Pro has a dot shape, sized a bit less than 0.1 times 0.2 millimetres.
Next was testing with different text sizes. We can see that with this machine – the 1mm text is still readable. We need to take in the effect that the speed is also quite high for this test (600mm/min). With lower speed the accuracy increases as we will see later.


Below is the engraving of two sets of squares on the right side, one inside the other. The inner square is engraved with 1000mm/min and the inner square is at 100mm/min.
We can see that at higher speed there is more wobbling present (mechanical) but the speed shows to have no effect on brightness of the engraved pattern. The Ortur Laser Master 2 Pro has very little wobble which is probably due to the machine being lower and the laser head being lighter.


Laser Focus Distance Test
In this test we will see how the laser dot size increases further down into the material. The further down in the material the dot stays focused, the thicker material you will be able to cut.
We achieve this by progressively lowering the board by 3mm for each square, without refocusing the laser head.
0mm means that the focus is perfectly set (with aluminium block). The 3mm square is engraved by lowering the test piece 3mm lower than the optimal focus. The result shows how big the dot is 3mm down into the material that is being cut. The same principle goes for larger distances.
We can see that the Ortur Laser Master 2 Pro performed a bit worse than the Sculpfun S9, but not by much. With greater distance the Ortur Laser Master 2 Pro spot size is getting bigger and weaker than with Sculpfun S9. This means that the Ortur Laser Master 2 Pro will not be able to cut thicker materials as effectively as Sculpfun S9.
Ignore the mistake at the 0mm square 🙂
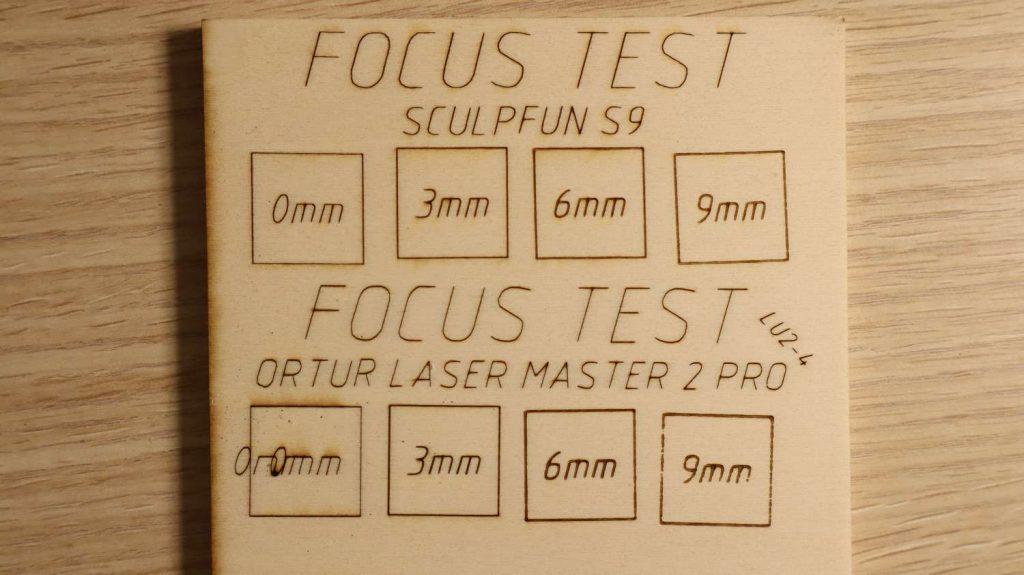
But farther away we go, the dot starts to increase significantly. At 6mm and 9mm the dot becomes quite thick compared to Sculpfun S9.
You can use the thickening effect to your advantage in cases when you want to engrave bigger stuff with low detail. You set up the laser in this out of focus position. The beam will be larger and the engraving will be done faster this way as the distance between engraved lines can be bigger.
Acrylic Engraving And Cutting
Did a short test on 3mm black acrylic (plexi glass) at 600mm/min. The engraving and cutting came out great with a clean cut edge. Ortur Laser Master 2 Pro was able to cut through in 9 passes.
We have omitted the blue acrylic cutting test since these machines can’t cut blue acrylic since it is the same color as the laser beam and thus reflects its light.


Plywood Cutting Test
Test was made at three different speeds with 3mm and 6mm thick Poplar plywood being cut.
The test was performed in both scanning directions – horizontal X axis (left-right) and vertical Y axis (back to front) as the cutting performance is different in each direction because the dot has rectangular shape.
Here is a comparison table between the Ortur Laser Master 2 Pro and Sculpfun S9.
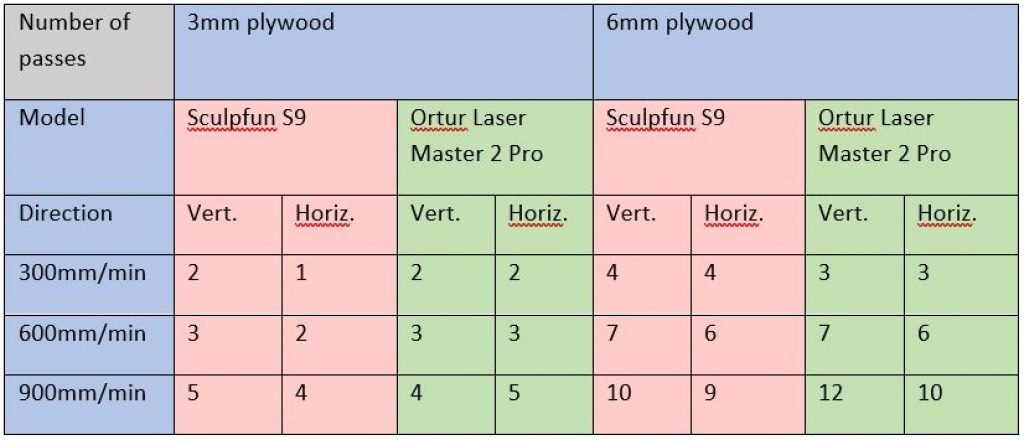


The Ortur Laser Master 2 Pro is a capable cutter with a quite balanced cutting performance.
Compared to Sculpfun S9 it starts to lag behind when cutting materials thicker than 6mm.
We made a test – trying to cut 10mm plywood at 600mm/min. The Ortur Laser Master 2 Pro did not cut through with 50 passes while the Sculpfun did it flawlessly with 12 passes.
With both machines, we lowered the laser heads about 5mm below the optimal focus, so that the optimal focus point was around the middle of the material which ensures the best cutting performance.
-

- Sculpfun S9

-
- Ortur Laser Master 2 Pro

Hardwood Cutting Test
This test shows how well the Ortur Laser Master 2 Pro cuts harder woods at 600mm/min.
First we tried to cut 4mm pine wood which is still quite soft.
Ortur has cut it in 10 passes.
Then we tried harder and denser 3mm thick Beech wood. The Ortur Laser Master 2 Pro had no problems cutting it and did it in 6 passes.

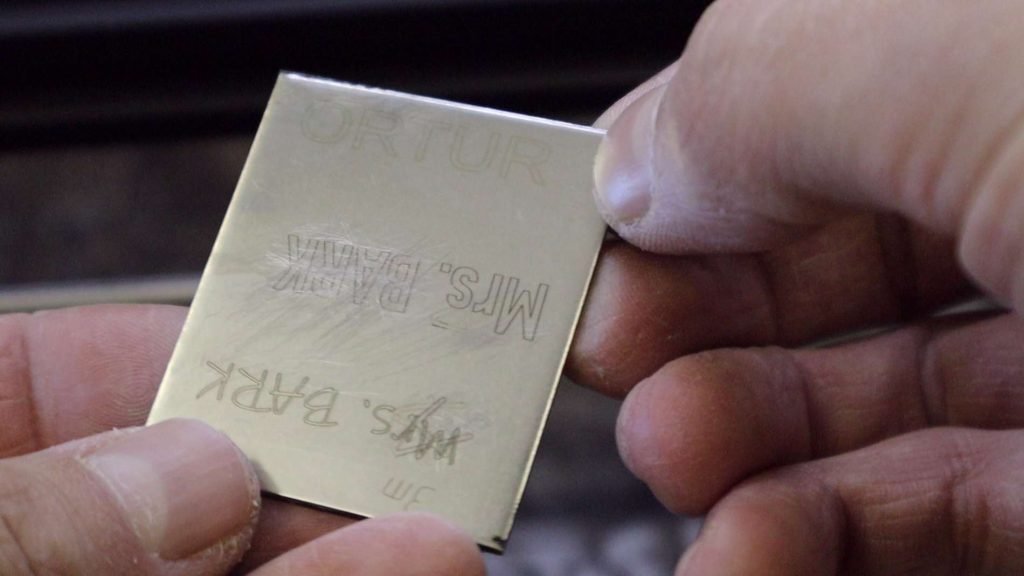
Engraving Stainless Steel
Tried to engrave ORTUR on blackened stainless steel with full power and 100mm/min. The engraving came out very light in color. Compared to the “Mrs. Bark” engraving I did with Sculpfun S9 using the same settings, we can clearly see that the Ortur Laser Master 2 Pro with LU2-4 laser diode is not as good at engraving stainless steel.
Laser engraver with good mechanics but a bit weaker laser module than the competition
Conclusion
Ortur has great mechanical part - belt tensioning, cable management and a lot of features like fire alarm and emergency stop switch.
But in our opinion it could use a stronger laser module and better light shield on the laser head.
Comparatively, the Sculpfun S9 has simpler mechanical part but has a much more capable laser diode that can cut much thicker stuff.
If you liked any of these machines, you can buy the them through the links below:
Buy Ortur Laser Master 2 ProBuy Sculpfun S9Be sure to also check out my reviews of newer laser engravers HERE!

This post was written by JT Makes It.
JT Makes It is an engineer, hobbyist, and DIY-er armed with a Master’s degree in Electrical Engineering and over a decade of professional experience in the industry. From an early age, JT Makes It was pushed by an insatiable curiosity, spending countless hours disassembling, understanding, improving, and creating various gadgets and products. This lifelong passion led to a broad spectrum of technical expertise ranging from electronics, woodworking, metalworking, and CNC machinery, with a particular focus on laser engravers.
For the past 9 years, he has shared his expertise through engaging videos on his YouTube channel. With the last three years dedicated to scrutinizing and testing laser engravers, he also created this website and emerged as a recognized authority in the field. His expertise extends across the spectrum of laser technologies, ranging from diode lasers, CO2 lasers, and fiber lasers, paying attention to details and providing practical insights.
With JT Makes It, expect a blend of technical expertise, backed with hands-on experience, and a genuine passion for innovation and creation, making him a trusted source in the realm of DIY and laser engraving enthusiasts alike.


Tags: Diode LaserOrtur


Thanks for this review. I just got mine and have been getting it out as a complete beginner.
I have to say that the hardest part is understanding the speed/power combination.
This is especially true when it comes to cutting 4mm ply. Do you go slow at a low setting? I’ll keep playing!
I rather use speed around 600mm/min and full power for cutting and then go with multiple passes, rather than going slower and do a single pass. Multiple passes at higher speed leave much cleaner and less charred edge.
You should use Poplar plywood. This cuts the easiest.