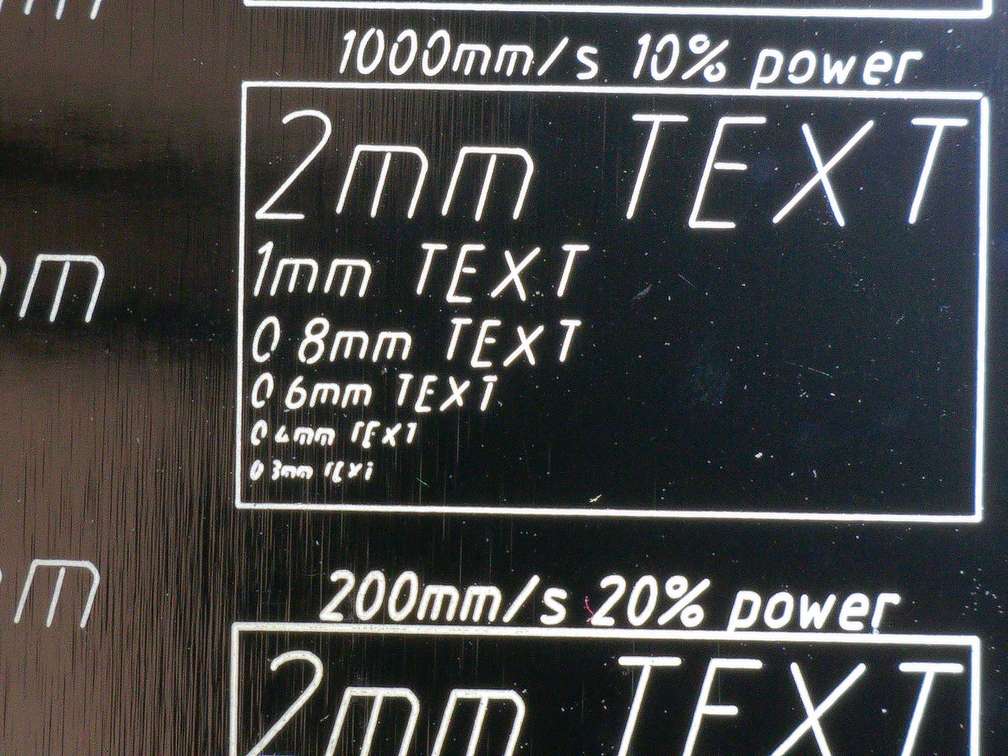
ComMarker B4 Laser Engraver Is an Affordable 20W Fiber Laser With Outstanding Performance!

Just a few years ago, a fiber laser engraver was something that cost tens of thousands of dollars and only just big companies could afford these wonderful machines. But today, thanks to the advancement of laser technology, even a small home business or a hobbyist can own one of these laser marking tools. A fiber laser engraving machine excels at engraving metal and plastics. It is precise and 100 times faster than conventional laser engravers. We have thoroughly tested the new and very affordable ComMarker B4 20W fiber laser engraver which delivers a lot of performance for its money with its motorized focusing Z-axis, live engraving preview, two different lenses, a rotary system, a foot pedal and handheld capability. It can also engrave in color! Read this review to see what it can really do!

The ComMarker B4 Review and Test

The ComMarker B4 [Official store, Amazon, Aliexpress] is a fiber laser engraver which offers 20W of laser power. It works in the invisible infrared laser spectrum of 1064nm which is excellent for engraving all kinds of metal parts and plastics.

It consists of two parts – the base which contains the fiber laser source and the laser head which has a galvo system which directs the laser beam with small mirrors through the lens and into the workpiece. It also offers very solid looking rotary axis and many useful accessories.

*The links on this website can be affiliate links. I earn a small commission at no extra cost to you. When you buy through these links you will support this website, which helps me to run this website(which cost money and a TON of time) and provide all these extensive reviews and information to you for free, without any paid membership.

What is a Galvo Fiber Laser Engraver?

“Fiber” describes its laser source and “galvo” describes the system for moving the laser beam:

What is a Fiber laser engraver?

Fiber laser engraver is often called a laser marking machine. It is often used for laser marking products quickly and precisely.

We will not go into technical details as there are many websites out there that can explain this much better. But here is the short summary: The fiber laser has a laser source which outputs laser light with the 1064nm wavelength in very short pulses (in duration of millionths of a second). Each of these pulses has a power in the range of a few watts. These pulses are stored in an optical fiber for a while, where a lot of them are added together, and then the powerful and short beam pulse is released out through the lens and into the material.

The fiber laser engraver does not output continuous laser beam. The beam always consists of short and powerful pulses. The optical fiber acts like a capacitor, storing the light energy for a while and then releases all the stored energy at once. This is why a 20W fiber laser like the ComMarker B4 can engrave metal very easily as the average power is only 20W but the individual short pulses of light can have more than 10kW of pulsed power which vaporises metal like butter!

What is a Galvo laser engraver?

The ComMarker B4 [Official store, Amazon] has no externally moving parts. The fiber laser source produces the laser beam which is then directed with a set of galvo mirrors. These small mirrors can move very fast and they direct the beam where it needs to go. The beam also passes through a special f-theta lens which allows the beam to be focused all across the flat working surface. By only moving small mirrors the galvo laser system delivers higher speed as it is 100 times faster than conventional X-Y gantry type lasers as there is very little weight to be moved.

Combining the fast galvo system with very powerful laser pulses of the fiber laser source, you get a laser engraver which is capable of engraving lightning fast! And this is where ComMarker B4 is very good at!

ComMarker B4 features and add-ons

You get a lot of stuff with this laser, including a very high-quality rotary chuck and better laser safety goggles, a foot switch and two lenses. You also get a solidly built distance frame for hand-held operation.

The large working area capability

The standard lens sets the working area to 110mm*110mm which makes the laser spot very small and powerful which is great for smaller and more precise engravings and you also get a larger lens which sets the laser marking area to 200*200mm which enables you to make very large engravings. A large laser marking field like this is very rare in fiber lasers, especially in this price range! In this review we will test both lenses to see how they differ in engraving performance.

ComMarker B4 110mm and 200mm lens option

Motorized autofocus Z-axis

The ComMarker B4 does not have moving parts except the motorized automatic lifting Z axis which is used for focusing and it can also be manually adjusted for more precise focusing. The machine is focused on a set distance from an object. You can measure it with a ruler or observe when the three red laser dots align. When the dots align, the machine is in perfect focus.

Chuck Style Rotary Axis

Chuck style rotary axis is the best as we saw with the xTool Chuck Rotary axis review article. It allows for a great precision and fast work.

Positioning the engraving on the workpiece

You can have a live preview with a visible red light with the ComMarker B4. The read beam can draw a rectangle around the perimeters of engravings for easier positioning on the workpiece.

This laser can also trace the individual vector shapes with a red light so you can have a live preview the actual engraving on the workpiece.

ComMarker B4 red laser live preview

ComMarker B4 Software Options

EZCAD2 software is a golden standard for fiber lasers

The ComMarker B4 can be controlled with the EZCAD2 software which comes on the included USB key and is the golden standard for most fiber lasers. It is a capable software which allows you to get everything out of you fiber laser. The software feels a bit dated, but it works without issues and there is a lot of information and tutorials on the internet for this software.

Control your ComMarker B4 with Lightburn software

The awesome thing about the ComMarker B4 is that it can also be controlled with the Lightburn software which has recently started supporting fiber lasers too. You need to have a Galvo license of Lightburn. We used both software in our tests, but we mostly used Lightburn which is what we are more used to.

Fiber laser has one more engraving parameter to set up

The fiber laser has one more setting compared to other lasers. Apart from speed and power you can also set the frequency which represents the frequency of stored pulses that come out of the optical fiber as we explained previously.

Fiber lasers emit very short pulses of light. The average power of these pulses is the specified power of the laser which is 20-watt in the case of ComMarker B4. But these pulses can reach 100 or even 1000 times the lasers rated power, because they are very short. This is why these lasers are very good at laser marking metals as the high-powered pulses vaporize metals instantly.

By adjusting the frequency, you can set the intensity of these pulses. With high frequency, the optical fiber will store light only for a short time and thus the stored energy will be small. With low frequency, there will be more time for storing the energy of the pulses and because of that, the stored energy will be greater.

You can imagine these pulses like hitting the surface with a hammer. Low frequency can be represented with a large hammer and a high frequency is a small hammer. With a small hammer you can produce a lot of very small hits in a given time, while with a large hammer, you can only produce a few powerful hits at the same time. This causes the laser beam to produce a different effect at different frequency at the same power setting as we will see later.

Using New Test Patterns to See the Different Engraving Effects

We have designed some test patterns which allow you to see the different effect certain parameters have on the laser marking performance of the ComMarker B4.

Interval test and measuring the laser spot size with 110mm and 200mm area lens

Lets measure the focus spot size with a simple interval test, together with some small text at different speeds and power to see how precise it is, and measure its laser spot size. We engraved the test pattern on painted black metal business card blanks.

ComMarker B4 small text and interval test comparing 200mm and 110mm lens performance

Testing the 110mm lens

The default lens of this laser has a working area of 110mm square. This is the lens you will use for finer details. We engraved the interval test to see how big the laser spot size really is. With the 110mm lens, the focus spot is very small, approximately 0.05mm in size. 

 This laser can engrave text as small as 0.3mm at very high speeds! Here is a tip of a ball point pen for comparison.

commarker-b4-small-text-engraving-110mm-lens-200mm

At 1000mm/s it starts to lose some of the precision which is expected. This is a very high speed for such small movements.

commarker-b4-small-text-engraving-110mm-lens-1000mm

At 3000mm/s it loses even more precision, but here you can see the effect of the frequency parameter. For this test, a relatively low frequency of 30kHz was used, and at this blazing fast speed, this frequency is not high enough to draw a continuous line.

commarker-b4-small-text-engraving-110mm-lens-3000mm

Testing the 200mm lens

You can also get the bigger lens which expands your work area to 200mm. The bigger lens also has longer focusing distance. With a bigger lens, you get a slightly bigger laser focus spot size and a bit less power for engraving. I did the same interval test with the 200mm lens and here are the results.

With this lens, the laser beam is approximately 0.1mm in size, which is still much better than conventional lasers.

Power vs speed test pattern on stainless steel

Here are two test patterns showing how the ComMarker B4 engraves at different speed and power levels at two different frequencies of 20kHz and 100kHz.

We can see that the higher frequency is more gentle on the metal and it leaves a polishing effect on the stainless steel with some blue tint with some settings. The lighter patterns aren’t really engraved, but that process is called annealing which is causing the metal to oxidize in certain way which leaves a permanent oxide layer on the surface. Its effect is hard to catch on a photo and is better seen in the video at the top of the article.

ComMarker B4 engraving on stainless steel speed vs power

Frequency vs. power test pattern on stainless steel

Here is a test pattern that shows how changing the frequency and power affects the engravings on stainless steel at two different hatch (fill) density of 0.05mm and 0.01mm.

We can see that the lower frequencies are used to remove a lot of material and produce deep engravings while the high frequencies are used more for clean-up and have a polishing effect on the metal.

ComMarker B4 engraving on stainless steel frequency vs power

Test patterns on raw aluminum

And here are some quick tests on aluminum. This laser is very powerful, and it is removing a lot of material from the surface. On the lower parts of the shapes we did another clean-up pass, covering half of the shapes.

With some combination of the settings, you can get very different results. High speed, low power and high frequency produce a polishing effect.

ComMarker B4 Real-Life Tests

Now we will show you some of the real-life scenarios and use cases of the ComMarker B4 fiber laser engraver so you will be able to see what it can really do.

Engraving metal business cards

Thanks to the very small focus spot size and a high speed of the ComMarker B4 laser engraver it was able to engrave this metal business card in a minute!  You should definitely check the YouTube video at the top of the article to see it in action!

The design was made with Kittl online designer which is a great tool to make a professional looking graphical designs in a matter of minutes.

ComMarker B4 fine details when engraving on aluminum business cards

Black engravings on stainless steel

You can also get a very dark engravings on stainless steel. Using low speed and 4mm defocused beam you can produce very durable and dark engravings on stainless steel. The engraving is a black oxidized layer which does not come off easily, not even with the use of abrasives!

Settings:

  • speed 50mm/s
  • Power 50%
  • frequency 25kHz
  • line interval 0.02mm, crosshatch

Cleaning dirty coins and rust removal with very fast speed

You can use this effect for cleaning dirty coins or removing rust. With low power and higher frequencies, the beam does not mark the metal, it only vaporizes the dirt and rust.

Thanks to the high speed of the ComMarker B4, it can be used as a very fast tool for removing rust from very difficult parts. It instantly vaporizes rust. On the right side I later did another cleanup pass across half of it, to achieve perfectly clean surface.

Settings for rust removal:

  • speed 3000mm/s
  • Power 50%
  • frequency 45kHz
  • line interval 0.01mm, crosshatch
  • + cleanup pass 3000mm/s, 10%, 100kHz, 0.01mm fill crosshatch

Using the large 200mm area lens for engraving large photos

Here I engraved a large bitmap photo using the 200mm lens. The laser marking was done at medium speed of 2500mm/s and 30% power. It took only 8 minutes to engrave this large image and the result is perfect! Conventional laser would need several hours for the same engraving!

Engraving anodized aluminum dog tags

This laser is also great for laser marking anodized aluminum. Once again, I got some vector shapes from Kittl to make a quick design to be engraved on a custom dog tag.

Kittl is great for making custom-made and professional-looking designs in just a few minutes. This is great for people like me, who don’t have much experience with graphical design. They have a large repository of ready-made templates which you can customize to fit your style.

Laser marking tiny stainless steel keychain or animal tags

With this cat tag, I set up a lot of layers, to get different colors of engravings. Thanks to the small focus spot size of the ComMarker B4, you can create very small stuff like this.

ComMarker B4 engraving on a small stainless steel cat collar tag

Engraving on small cylinders or pens

When engraving cylinders, your design will always get distorted. You can get around this with cylinder correction in Lightburn or EZCAD 2. In the preview you can see how it corrects the geometry to take into the account the roundness of the surface. The result is perfect. The difference is obvious if compared to the non corrected round logo on the left.

ComMarker B4 geometric correction

High contrast engravings on acrylic and some other plastics

The Commarker B4 works with the same wavelength as the x-Tool infrared laser module which I have tested a while ago. This is why the ComMarker B4 is also very good at engraving black acrylic. The laser marking process melts the acrylic and the engraving pops out and is very durable.

But this effect only works on black acrylic and some other dark plastics. I have yet to find the correct settings for colored acrylics. I think it can be done on other colors too with some tinkering (with the exception of transparent acrylic) since you can see some colored acrylic engraved with ComMarker B4 on their website.

But supposedly some white plastics can also be engraved as some settings can make the engravings dark.

Marking Products in a Serial Production/Batch Engraving

Thanks to the high speed of the ComMarker B4, you can use this laser for series production. The laser table has threaded holes which you can use to mount the jigs or holding brackets for fast and consistent alignment of the engraving job.

You can also use the included foot pedal to engrave objects hands free. Each pedal press will start the engraving process.

ComMarker B4 foot pedal for automatic serial number engraving

Automatic serial number/text increment

You can use this laser also for marking serial numbers or custom text in a series production. Lightburn and EZCAD2 support automatic serial number increment. By setting the text type to variable text, you can set it up that it increments the serial number after each engraving job.

Lightburn also supports many other variable text functions. It can also automatically engrave the current date and time. If you use the included foot pedal, you can quickly engrave serial numbers or barcodes on your products. You can also import predetermined text from a CSV format. Each engraving job chooses a text from a new line in the CSV file.

You can read more details about variable text in Lightburn here.

Marking multiple pieces at once

With my blue diode laser engraver, I cut out a wooden template for engraving shopping cart coins. For 16 coins it took only 2 minutes to finish the engraving process with two engraving stages (engraving and clean-up pass). You can engrave large quantities very fast, and this enables you to earn more than 100$ an hour with this laser. This way, the laser can pay for itself very quickly.

Engraving Cylindrical Objects with the Rotary Chuck

You can also use this very solid looking rotary chuck for engraving cylindrical objects. It is heavy and feels very high quality. It has spring-loaded jaws. The clamping force can be reversed by changing the direction of the spring. With the jaw you get a lot of differently sized pins, which enable you to clamp any type of cylindrical object.

We tried to engrave a metal ring to see what level of detail you can get. The setup in Lightburn is simple. You need to select the chuck type and the correct rotary axis and the correct steps per rotation for this chuck type and of course set the object diameter.

We also made another very detailed engraving on the inside of the ring! The chuck was set at an angle and the clamping spring was reversed.

This ComMarker B4 is capable of engraving with an amazing precision!

ComMarker B4 very fine engravings on the inside of the stainless steel ring

Removing paint from stainless steel cups

You can use this laser for removing the paint and coatings from stainless steel cups.

Low power and high frequency don’t mark the stainless steel, but can effectively remove the paint.

I also made this design in under a minute using Kittl logo designer. It can really bring your work to the next level with no special knowledge required.

ComMarker B4 removing paint and coatings from stainless steel cups

Engraving in COLOR

With the right settings on the ComMarker B4, you can also produce colored engravings on titanium. With a dense hatching pattern and by defocusing the beam for a few millimetres, you can produce a wide range of colors on titanium.

This process is called annealing. It is heating the metal to the different temperatures which cause the colored oxide layer to form on the surface. This is permanent coloring that does not come off easily. It is the same thing you see happen on exhaust tips of some performance cars.

ComMarker B4 color engraving annealing on titanium

With some practice you can make a very cool colored designs on titanium! This is my favorite feature of this laser engraver. But the colors are very hard to get right, as the color heavily depends on the defocusing distance. This is why the wave behind the surfer is red instead of blue in this engraving. But it is still very cool. This design was also made with Kittl.

ComMarker B4 color engraving annealing on titanium

Very Deep Engraving in Brass (And Other Metals)

Using a single pass, you can engrave pretty much anything. But if you want a very deep engraving, you need to introduce a lot of passes.

If you use a lot of passes, you can remove a lot of material and produce very deep engravings like this engraving I did on brass. First, I did a around 30 of powerful engraving passes with high power and low frequency, followed by a lot of fast clean-up passes with low power and high frequency. The whole job took almost half an hour.

The engraving has some good depth to it.  I used the clean-up passes only for the deep parts, which left a nice-looking dark edge around the engraved vectors for easier readability.

Even more depth could be achieved by letting it run for longer.

ComMarker B4 Fiber Laser Engraver Pros and Cons

 ComMarker B4 20W fiber laser engraver is a great tool for metal engraving. It eats all the metallic stuff like butter, but of course it can’t engrave everything since a laser that can engrave all materials doesn’t exist:

Pros:

  • engraves all types of metals
  • can engrave leather, stone and PCBs
  • engraved anodized aluminum like butter
  • can produce colored engravings on titanium
  • good results when engraving some plastic
  • with some tweaking of the settings you can get all sorts of different results – from polished and shiny metal surface to black, brown, grey and white engravings on the same material
  • great for cleaning coins and polishing metal or removing rust
  • very small laser spot size (as good as it gets for fiber lasers in this price range) enables you to engrave with high precision and incredible detail
  • galvo system enables you to engrave with incredible speed. What took hours on conventional laser can be done in minutes on this one. Small vector designs can be engraved in a blink of an eye!
  • with the small 110mm lens you can engrave small and precise and with the 200mm lens you can engrave very large designs with incredible precision and speed
  • supports EZCAD2 and Lightburn!
  • Very high quality rotary chuck
  • foot pedal comes very handy for serial production
  • includes bracket for handheld operation
  • includes good safety goggles
  • live engraving preview with red light
  • solid build quality
  • very compact size if compared to similar 20W fiber lasers
  • competitive price

Cons:

  • A bit more experimentation is needed to find good settings because of additional frequency parameter that the fiber lasers have (but it is still very easy to use)
  • Z-axis motor is a bit loud
  • it can’t engrave wood and similar organic materials (none of the fiber lasers can)
  • can’t engrave glass and transparent materials (none of the fiber lasers can)
  • it takes a bit of time to align the red preview light with the actual engraving location in the Lightburn. But once it is set you don’t need to align it any more.

Very capable laser engraver for metal and plastics for a very competitive price!

Conclusion

The ComMarker B4 is a very compact 20W fiber laser engraver which offers A LOT of performance for its money. It has everything that other professional engravers have. It can laser engrave stuff in a blink of an eye and with incredible precision and accuracy. It is very fun to play with it and there are a ton of use cases. The more you play with it the more stuff you will find you can do with it. It is a professional and versatile device, it is competitively priced and there aren't many cons we could find with this machine.

You can buy it from the ComMarker official store (Use coupon code "jtmakesit" for 2% off!) or on Amazon and Aliexpress.

Thanks for reading!

Buy the ComMarker B4 in the Official store!Buy Commarker on Amazon

Be sure to also check out my reviews of newer laser engravers HERE!

Check out other stuff we have reviewed:

1
Review and Test: ComMarker B6 60W JPT MOPA – Smaller Size, More Brain, Same Power!
Deal
2 weeks ago

ComMarker B6

Today I will test a new addition to the ComMarker family, the ComMarker B6. Specifically, the stronger, 60W JPT MOPA version. The ComMarker B6 is a significant improvement to the older ComMarker B4 ...
Editor choice
1
Reviewed and Tested: xTool F1 Ultra – A True Jack Of All Trades, But a Master of SOME!
Coupon
1 month ago

xTool F1 Ultra

Today we going to test the xTool F1 Ultra, a world’s first dual-source laser engraver that features camera autofocusing, a 20W blue diode laser module and 20W infrared true fiber laser source, all ...
1
Atomstack A70 Pro Review – Better Than CO2 Laser?
Deal
2 months ago

Atomstack A70 Pro

In this article I will review one of the strongest diode laser engravers currently available today. The Atomstack A70 Pro is a monster of a laser engraver, featuring a 70W diode laser source. Like ...
1
Review: WeCreat Vision – All-In-One Solution for Easy Laser Engraving!
Coupon
2 weeks ago

WeCreat Vision

100$ off!
In this article I will review a laser engraver called WeCreat Vision. It is a fully enclosed laser engraver, featuring a 20W blue diode laser module, autofocus and camera system. It looks like a well ...
Editor choice
1
ComMarker B4 60W JPT MOPA Review – All You Need To Know About This Fiber Laser!
Coupon
4 months ago

ComMarker B4 JPT MOPA

2% OFF!
Primarily designed for engraving metals and plastics, the ComMarker B4 JPT MOPA fiber laser engraver extends its functionality to various other materials too. It can engrave deep or shallow, polished ...
1
Atomstack MR20 Review – Is It Worth the Money?
Deal
4 months ago

Atomstack MR20

In this review article I will take a look at the Atomstack MR20, a 20W fiber laser upgrade for Atomstack diode laser engravers. With this upgrade, you will be able to use your Atomstack laser ...
5 Comments
Show all Most Helpful Highest Rating Lowest Rating Add your review
  1. Thank you for a great review!! Very useful and detailed.
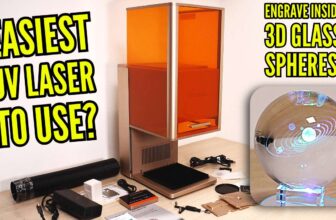
    I am looking to buy this laser, and had a few questions to ComMarker – one was the frequency range of this particular unit. Their reply was 27-62kHz. You made a test at 25kHz. Was that because you didn’t know the frequency range or did you have a model different from the final version?

    Thank you again!

    • Reply
      Hobby Laser Cutters February 6, 2023 at 20:06

      Hi, I have used it from 20kHz to 100kHz, but I don’t have a way to measure the frequency. The results from 20kHz to 30kHz and from 60kHz to 100kHz don’t look much different, I don’t know if this is due to the frequency range being limited or it is just physics. Mine was the pre-production prototype. It should have same or worse performance to the production units.

      • Thank you for your reply!
        Yes, could definitely be because of frequency limitations that you don’t see much difference at low and high end frequency. But I guess the videos don’t lie, it does what it does and pretty well, too – at this price.
        I will buy one!

  2. Do you have the test grid files you used to test this laser published somewhere? I would like to get ahold of them to use them on my B4 when it arrives.

    Leave a reply

    Hobby Laser Cutters and Engravers
    Logo
    Compare items
    • Cameras (0)
    • Phones (0)
    Compare