Make A Laser Cut Drill Bit Organizer And This Incredible Drill Bit Sorting Gauge
You don’t have time for this kind of hassle. Stop wasting so much time, sorting through piles of drill bits, just trying to find the right one when you need it the most! And if you don’t have a CNC machine, don’t worry! If you stick with this post, I will show you how you can get this drill bit sorting gauge machined out from stainless steel which will last you a lifetime!-
My version works with metric bit sizes in 0.5mm increments, but you can easily modify it for imperial system. The drill bit organizer box and sorting gauge is compact enough to fit on your workbench wall, and it is strong enough to hold over 100 drill bits at once. The drill bit organizer box is made from laser cut plywood and the sorting gauge is made from aluminium, so it will last a lifetime!
Here you can firstly enjoy this well put together video showing the entire build process together with some really cool shots.
The Box Design
The box is designed to be cut from 4mm Poplar plywood (soft and cuts very nicely) and has 30 compartments. I left some of the compartments unlabelled. There you can put miscellaneous stuff or you can use the blank compartments for putting in the worn out drill bits that need to be sharpened. The design is in a .dxf format, you can modify the labels as you want.
The box itself is not a my design, I have used this awesome and free laser box generator:
https://www.festi.info/boxes.py/SlatwallDrillBox
You can see the settings I used in the photo above. I have also attached the exported .dxf file.
With this generator you can change your wood thickness or compartment numbers and design a custom box in minutes! It is really a great tool! Also check other stuff on this website, there are many, many generators for boxes of all sorts! Even flexible boxes!
Although, you need to keep an eye on the outputs it gives you, because sometimes, the design can’t be made according to your inputs and it sometimes produces some funky stuff that does not work :)
Cutting The Plywood
For cutting, I used my current favourite Sculpfun S9, which has a very compressed and long focus range. It is still just a 5W laser, but it can cut the 4mm Poplar plywood in about 6 passes at 600mm/min speed. If you go slower, it can even cut it in a single pass, but the slower you go, more charring occurs and the edges get much darker. At 600mm/min, this machine produces a very clean cut, not burned at all! The poplar wood is the best for cutting with laser engravers because it is quite soft and easily workable.
Even though the machine can cut through this board in 6 passes, I always run more passes than the minimum. For this job I have set 10 passes, because wood is not homogenous material, sometimes you get patches of harder wood or even some glue and this will quickly cause spots that were not cut though and to avoid this problem I set some extra passes.
If you want to learn what else this machine can do, you can check my technical review of this machine here:
https://hobbylasercutters.com/sculpfun-s9/
Thic machine cuts very well and does not leave a charred edge like other less capable engravers.
The Sculpfun S9 machine took around 2.5 hours to cut everything out. I did it in two runs, as everything does not fit on one working surface.
I am still surprised how well does this machine cut. Cuts are clean and without burns at all.
Assembling The Box
Some hammering might be needed to press everything nicely together. Just don’t forget to put some wood in between your hammer and the box, so you don’t damage the surface. Add some glue on the joints.
If I would be making the box again, I would probably slightly decrease the burn value for a bit looser fit so the assembly would be easier. But it is still easy enough to assemble and it stays together very strongly.
I used a file to make a bit of chamfer on the longer boards (see the video) where there are a lot of teeth to be joined at once. This way everything slides together smoother.
I used the default 0.1mm “Burn” value in the box generator. With this machine, this produces a very snug fit. The box would probably stay together without glue :)
If you use a different laser machine, you should first do some test cuts to see if the fit is good:
https://www.festi.info/boxes.py/BurnTest?
Note that most of the diode laser engravers have a very rectangular beam shape which means that orientation of the cut (X or Y axis) on the laser bed has an effect on the snugness of the fit. The Sculpfun S9 still has a rectangular dot, but it is way less rectangular than other machines I have tested and everything fits together nicely.
I don’t have a slatwall, so I have cut off the wall mounting hooks and screwed in two holders, cut out from a 6mm thick plywood in order to mount it on a wall in a classical way. I have recessed the nuts so it lays flat on the wall.
CNC Routing The Drill Bit Sizing Gauge
Now we need a drill bit sorting gauge which will help us sort the drill bits much faster than with the digital caliper.I routed the gauge from aluminium with my small CNC router. If you want to get the .dxf files to route the parts yourself and get more details about the build visit the Instructable I have written with more details about this project:
https://www.instructables.com/Laser-Cut-Drill-Bit-Organizer-With-CNC-Routed-Dril/
I really suggest watching the YouTube video at the top of this post, because I got some really cool shots of the CNC routing process :)
For you guys who don’t have a CNC router at hand (as they are much more expensive than a simple laser engraver), I have tested the CNC fabrication service from PCBWay as they were kind enough to offer me their services so I can give you guys more options for making this sizing gauge.
You can register through this link:
https://www.pcbway.com/ (Link is referral link, you will get free 5$ extra credits to your account!)
Upload these files in their quotation form to get the thing fabricated in one piece and save some hassle:
https://hobbylasercutters.com/wp-content/uploads/2021/10/Files-for-Pcbway-production.zip
I chose stainless steel and brushed finish. So it will last a lifetime! In the .zip file I have added vector file for laser engraved numbers instead of routing them out like I did. If you want to save some money, you could get this thing made out of a bit thinner material. Mine was 5mm, but a 2 or 3mm stainless gauge would still work just as well and last just as long (infinitely)
The Completed Project
This project will help you get your workshop more organized and it will save you a lot of time that you can now dedicate to making things!
Thanks for reading through this post!
If you like to get more detailed view on this project, visit the Instructables post I have written, which contains even more build details:
https://www.instructables.com/Laser-Cut-Drill-Bit-Organizer-With-CNC-Routed-Dril/
Tags: cnc routingdesktop laser engraverdiy drill bit organizerdrill bit boxdrill bit diameterdrill bit gaugedrill bit organiserdrill bit organizerdrill bit organizer boxdrill bit size tooldrill bit sizingdrill bit sortingdrill bit storagedrill bit storage traydrill bit tooldrill gagedrill point gaugedrill storagefree plansjtmakesitlaser cutlaser cut drill bit boxlaser engraving machinescrew bit storagesculpfun s9shop projectslat wall boxworkshop organization
j’essaie de trouver le pîlote de mon s9 que j’ai reçu hier. .besoin d’aide. Merci!
This tutorial will help you to setup the machine in Lightburn (or LaserGRBL – here is tutorial for both programs):
https://gzhls.at/blob/ldb/f/b/e/c/5c238a8e46a7541a755e8ab8326381fef7dd.pdf
The tutorial is for Atomstack, but it is the same setup for Sculpfun.
This is a great project but I have an xTool D1 engraver/cutter and every attempt to download the project file or even use the box generator using your settings have failed. Either there isn’t enough parts or all the parts are there but all the parts together are so small the entire box would only be about 5 inches in length and maybe 2 inches tall. Is there any help you can provide? I am a first time user and was trying to find something I could use and this fit the bill perfectly and I really want it to work. Please help!
Thanks
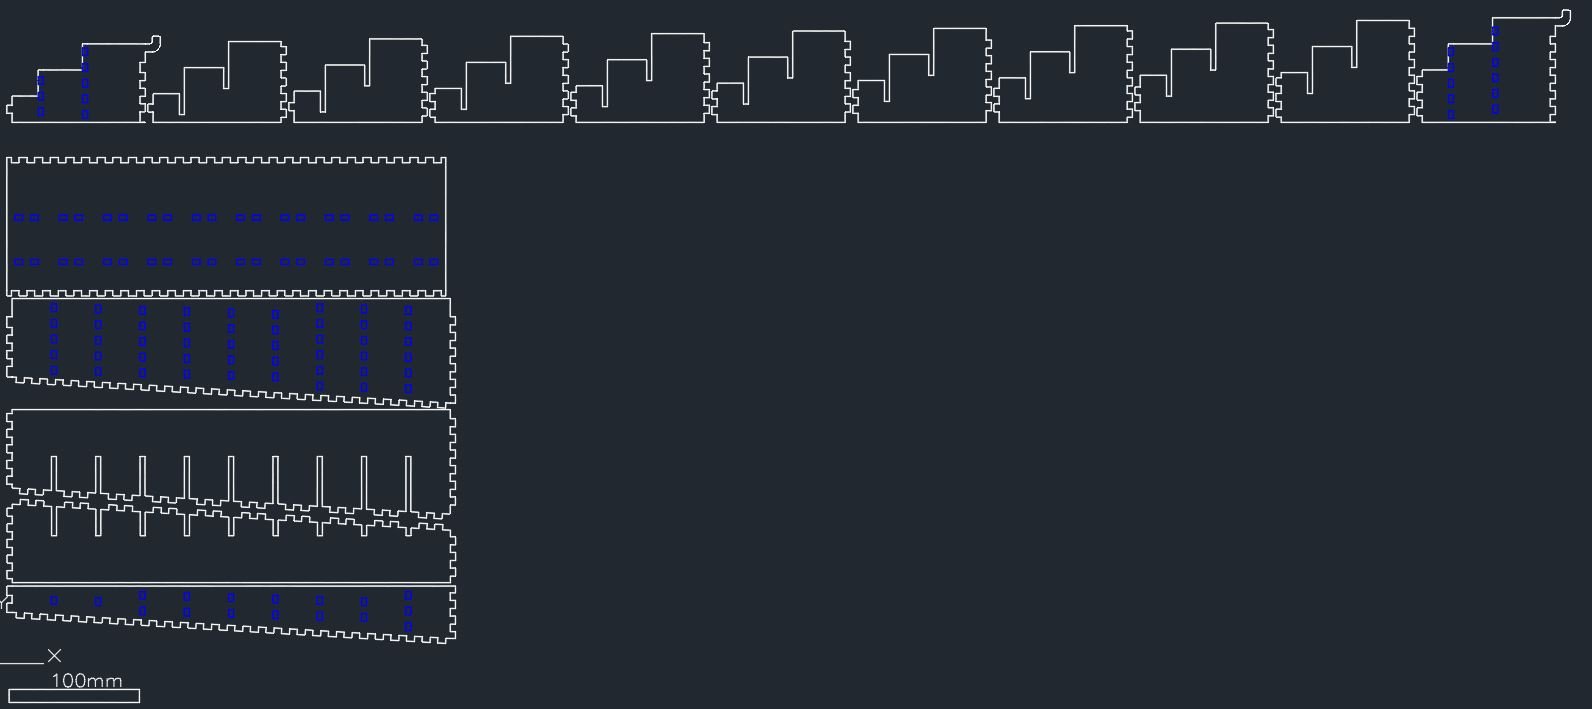
Hi, In this extended article you will be able to download the .dxf file for my drill bit box:
https://www.instructables.com/Laser-Cut-Drill-Bit-Organizer-With-CNC-Routed-Dril/
But if it still comes out too small, you probably have the units wrong in the software. Maybe try metric units.